Deck stair railing code requirements, height rules, the 6-inch sphere test and graspability for welded picket and Flex Rail systems.
This article is part of our complete Aluminum Deck Railing guide.
Looking for glass stair railing? See our dedicated Glass Stair Railing Guide.
Stair railing is the part of the project that catches people off guard. The level deck section is straightforward: set posts, connect rails, drop in infill. Stairs add angles, height transitions, graspability requirements, and a set of code rules that don't apply anywhere else on the deck. Most installation problems we hear about from our dealer network happen on the stair section, not the level run.
We manufacture two stair railing systems at our facility in Aldergrove, BC: welded picket stair panels and Flex Rail stair panels. Both go through the same 5-stage pretreatment and AAMA 2604 powder coating process, and both are engineered to meet the National Building Code of Canada 2020 and the US IRC. But they solve the stair problem in fundamentally different ways, and understanding why matters more on stairs than it does on a level deck.
This guide covers the code requirements specific to stairs, how both systems work, the real-world installation sequence for each, and why the scheduling problem on stair railing is something every contractor should understand before ordering.
Why stair railing is different from deck railing
On a level deck, railing is essentially a fence. Posts go straight up. Rails run level. Every component is square to everything else.
On stairs, nothing is square. Posts sit on angled treads. Rails follow the stair pitch. The height is measured from a different reference point. The sphere rule changes. And the top rail might need to be graspable even if the level deck section doesn't require it.
| Requirement | Flat deck guard | Stair guard |
|---|---|---|
| Minimum Height | 42" from deck surface (Canada); 36" common in US residential | 34" to 38" measured from the stair nosing |
| Graspability | Not required on most level guards | Required by many municipalities on stair handrails |
| Height measured from | Top of deck surface | Nose of the stair tread |
| Post cut | Straight, level cut | Angled cut matching stair pitch |
| Panel angle | 0" (level) | 1" to 45" depending on stair pitch |
Every row in that table is an additional variable the installer has to get right. That's why stair railing costs more, takes longer to install, and generates more inspection failures than level railing.
Deck stair railing height: the nosing rule
This is the most misunderstood measurement in deck railing. On a level deck, you measure from the deck surface to the top of the rail. On stairs, you measure from the nose of the stair tread to the top of the rail.
The nose of the tread is the front edge, the part that overhangs the riser below. This is the reference point because it's where someone's foot lands and where a fall is most likely to start.
In Canada, stair guards must be between 865 mm and 1,070 mm (34" to 42") measured from the nosing. Most municipalities require 36" minimum. In the US, the IRC requires 34" to 38" from the nosing for residential stair handrails.
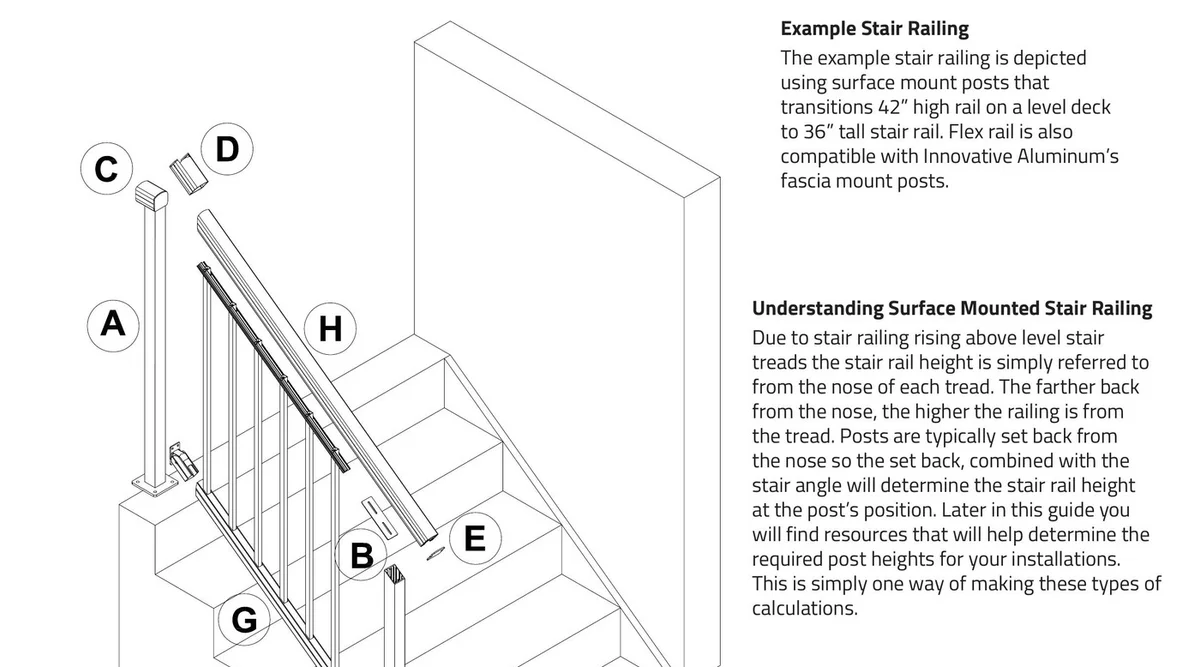
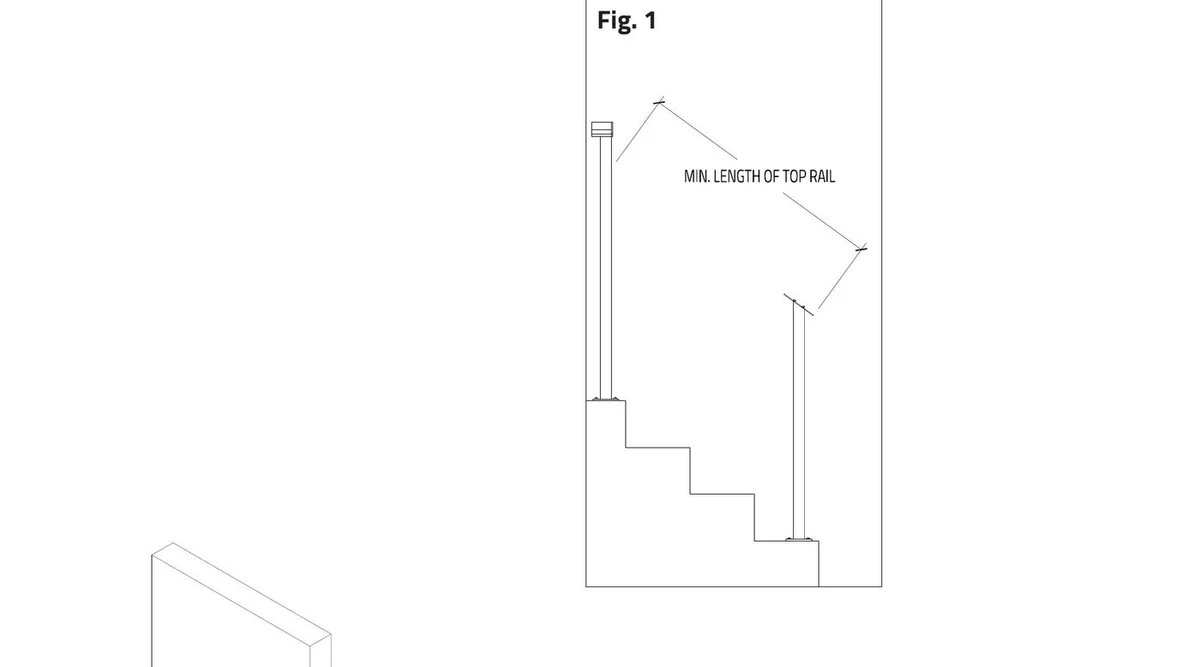
The practical implication: stair posts are taller than you'd expect. Our 1.72" stair posts are cut to 40 1/8" before the angled top cut, because the measurement from the tread surface (where the base plate sits) to the nosing reference line adds height that the post needs to cover. Where the post sits relative to the nosing matters too. A post set further back from the nosing has a greater vertical distance to the tread surface, so it needs to be taller. This is why our installation guide includes a dimension chart based on stair angle and post setback position.
Full code details for both flat and stair sections: Deck Railing Building Code Requirements
The 6-inch sphere rule on stairs
On a level deck, the 4-inch sphere rule applies: no opening in the guard can allow a 4-inch sphere to pass through. This governs picket spacing on level sections.
On stairs, there's an additional rule. The triangle formed between the bottom rail, the stair tread nosing, and the riser face cannot allow a 6-inch sphere to pass through. This triangle exists because the bottom rail follows the stair angle while the treads are horizontal, creating a wedge-shaped gap that gets larger as you move away from the nosing.
What this means in practice: the bottom rail has to sit close enough to the tread nosing that the 6-inch sphere test passes at every tread. If the bottom rail is too high or too far from the nosing, the gap opens up and fails inspection. Our welded picket stair installation guide specifically calls this out in Step 1. This is one of those details that gets missed on DIY installations and caught by the inspector.
Does stair railing need to be graspable?
This depends on your municipality, and it's the code requirement that creates the most design compromise on stairs.
Many building departments require that stair handrails be "graspable," meaning your hand has to be able to wrap around the profile. The logic is straightforward: on stairs, people need something to grab if they slip. On a level deck, leaning against the railing is the primary interaction. On stairs, gripping the rail is a safety function.
We offer four top rail profiles: square, round, colonial, and flat. Round and colonial meet the graspability requirement in most jurisdictions. Square is borderline depending on local interpretation. Flat top typically does not qualify because it's too wide for your hand to wrap around.
The Powell River, BC project by Modern Powell River is a real-world example of this playing out. The local municipality there only accepted the colonial top rail profile as graspable. The homeowner used flat top on the level deck sections, where graspability isn't required, and colonial on the stairs, where the city demanded it. The result is a mix of top rail profiles on the same property, driven entirely by local code. It actually looks good because the colonial profile adds visual weight to the stair section where you want it, and the transition at the sleeve post is clean because the colour and hardware match across both profiles.
If your municipality requires graspability and you want a flat or square top rail on your level sections, plan for the mixed-profile approach. The colour matches across all four profiles, and your dealer can confirm which profiles your local authority accepts as graspable before you order.
The scheduling problem: why stair railing delays projects
This is something only manufacturers and experienced contractors know about, and it's the reason we developed the Flex Rail stair system.
Here's what typically happens on a residential deck project. The builder constructs the level deck first. Stairs come later, sometimes weeks later, because the stringers and treads are a separate phase of construction. The railing contractor comes to site to measure. They can measure the level deck sections immediately and place the order. But the stairs aren't built yet. The stair stringers aren't in. The treads aren't on. The angle is unknown.
For our welded picket stair panels, we need to know the exact stair angle before manufacturing. Could be 32 degrees, could be 35, could be 34 and a half. They're all different panels because the pickets are welded at the factory to match the specific angle. A welded stair panel can't be adjusted in the field. Our panels are available from 1 degree to 45 degrees, but the angle has to be specified at the time of order.
With a typical 2 to 4 week lead time, this creates a scheduling bottleneck. The railing contractor can't order the stair panels until the stairs are built. The stairs often aren't built until the framing contractor finishes other structural work. So the railing contractor comes back to measure the stairs, places the stair order, waits another 2 to 4 weeks, then comes back a third time to install. Three site visits for what should have been one job. That's expensive for the contractor and frustrating for the homeowner.
This is the problem Flex Rail was designed to solve on stairs.
Welded picket stair railing: the factory-set system
Welded picket stair panels are our traditional stair system and the one we've been manufacturing since 2004. The pickets are factory-welded to the top and bottom rails at the exact stair angle, creating a rigid one-piece panel that's code-compliant before it leaves Aldergrove. There's no field adjustment of the angle, no guessing about picket spacing. It arrives ready to install.
Components
The stair system uses 2.5-inch stair posts at the top of the run, 1.72-inch end posts at the bottom, welded picket stair panels (available in lengths up to 20 feet, at angles from 1 degree to 45 degrees), top rail stair sleeves, bottom stair sleeves, stair post mount plates, and screw-on end caps. For runs exceeding 20 feet, stair center sleeves join two panels end to end. All connections use #10 x 3/4" tek screws with #2 and #3 Robertson square drive bits.
For the full component breakdown including sleeve posts, base plates, and connection hardware.
Installation sequence
The welded picket stair installation follows a specific sequence. Getting the order wrong creates problems that compound with every subsequent step.
Line up the panel. Position the top 2.5" stair post and the bottom 1.72" end post on the stairs. Lay the welded picket panel alongside them. The starting and ending picket gaps (the space between the first/last picket and the adjacent post) must be equal on both ends. These gaps need to be large enough for sleeves to fit but can't exceed 4 inches. Position the panel vertically so the top rail sits between 34" and 38" from the nose of the stair tread. Check the 6-inch sphere test at the bottom rail against every tread nosing.
Determine center post locations. With the panel still in position, figure out where center posts will go. Center posts replace an existing picket in the welded panel and can't be spaced further than 6 feet on center. Set each center post base plate far enough back from the stair nosing that the anchor fasteners won't crack the tread edge, especially on concrete stairs where drilling near an edge can split the nosing. Mark the top and bottom rails at each center post location, leaving a minimum 3/8" gap where sleeves will be installed. Mark the angle and height cuts on the tops of all posts.
Cut the panel and posts. Take everything down. Cut the top and bottom rails at all marked locations. At each center post position, break out the 5/8" picket being replaced: cut the rails on either side and snap the picket free from the welds. Cut the angled tops of all center and end posts. Before every cut, confirm the screw chase is aligned with the railing direction. The installation guide calls this out four times because it's the single most common mistake, and it's impossible to fix without pulling the post and starting over.
Assemble the panels. Fasten stair post mount plates to all center and end posts using tek screws. Slide the bottom stair wall mounts onto the welded picket bottom rail but don't tighten them yet (you need the ability to slide them into final position). Screw the stair post mount plates to the top rail. Then attach the bottom wall mounts to both the posts and the bottom rail.
Install top wall mounts. Slide top and bottom wall mounts onto the panel. Position the top 2.5" post and the assembled panel on the stairs. Mark the wall mount locations on the 2.5" post. The top wall mounts attach to the 2.5" post with the fasteners facing inward, so they're hidden when the panel is in place.
Fasten posts to stairs. Last step. All posts get screwed to the stair treads using fasteners appropriate for the substrate (wood screws for wood framing, mechanical anchors for concrete). This is last because you want everything assembled, aligned, and confirmed before making permanent connections to the structure.
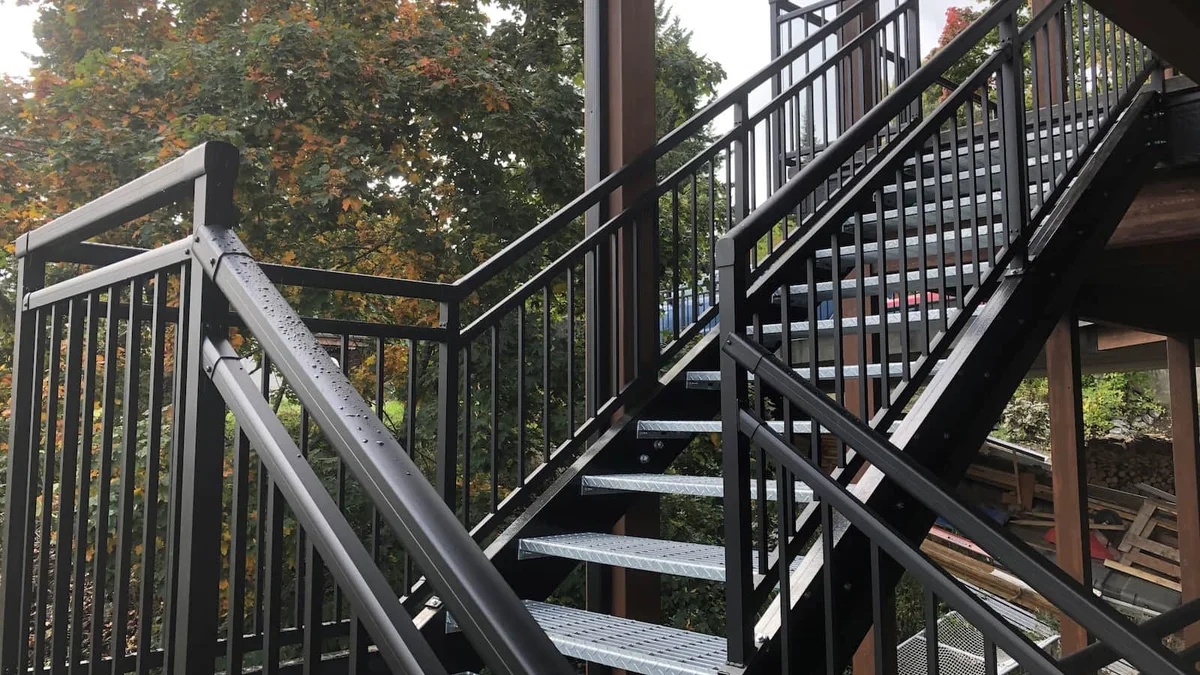
The Christina Lake, BC project installed by Grand Forks Deck and Rail shows the welded picket system on stairs in a real-world setting. Textured black finish, surface mount posts on natural rock terrain, a gate at ground level, and the stair section tying into the level deck above. The consistent colour across the entire project (picket on the lower level, infinity glass on the upper deck) shows how the stair section becomes part of a larger design when the finish and hardware match throughout.
When to choose welded picket stairs
Welded picket is the right choice when you know the stair angle at the time of ordering, the stairs are already built (or will be built before the lead time expires), and you want a factory-set panel that arrives code-compliant with zero field assembly of the picket spacing. It's a rigid, proven system.
Flex Rail stair railing: the field-adjustable system
Flex Rail on stairs solves the scheduling problem. The articulating sleeve system adjusts to any standard stair angle on site, which means the railing contractor can order the entire project (level and stair) in one batch before the stairs are even built. One order, one delivery, one installation visit.
How the articulating system works
The key component is the articulating sleeve at the stair-to-deck transition post. Unlike the fixed-angle sleeve on a welded picket stair section, the Flex Rail stair sleeve has a larger cutout on the bottom than the top to allow for the downward orientation. The level deck rail typically sits at 42 inches. The stair rail connects about 6 inches lower at the transition post. Two screw holes on either side of the sleeve capture the post, and the sleeve can be angled to meet whatever stair angle the builder ends up creating.
The bottom wall mounts use a knuckle system that articulates, allowing the bottom rail to follow the stair angle rather than being locked to a factory-set pitch. Each picket has a slot that prevents it from interfering with the sleeve at the connection point, so pickets can be snugged right up to the sleeve for a tight, clean joint with no visible gap.
The Flex Rail stair system uses the same glass/Flex Rail top rail extrusion as the level system (the one with the deeper recess on the underside). This is a detail that matters for stocking dealers: they can carry one top rail profile and use it for both their level and stair Flex Rail installations, and for glass installations too. It simplifies inventory across all three product lines.
The photo above shows the top rail installed with the Flex Rail stair sleeve at the transition post, with the end cap at the bottom. At this stage, the frame is ready to receive the infill. The stair insert panels will snap in from below, the same way they do on the level system.
Post cutting for Flex Rail stairs
Cutting stair posts for Flex Rail follows a specific formula that accounts for the stair angle, the post position relative to the nosing, and the sleeve dimensions:
1. Determine the stair angle using an angle finder placed on the stair stringer or a tread.
2. Measure Dimension B: the height from the nosing reference line to the tread surface at the post location. This dimension changes depending on how far back from the nosing the post sits. Posts set further back from the nosing have a larger Dimension B because the tread surface drops away from the nosing as you move back.
3. From the top of Dimension B, measure 36 inches up and mark. This establishes the top-of-rail reference.
4. Look up Dimension A in the trim dimension table based on your stair angle. This is the amount to subtract from the top to account for the sleeve and mount plate height.
5. Overall post height = 36" minus Dim A plus Dim B. The angled cut at the top follows the stair pitch with the screw chase aligned to the railing direction.
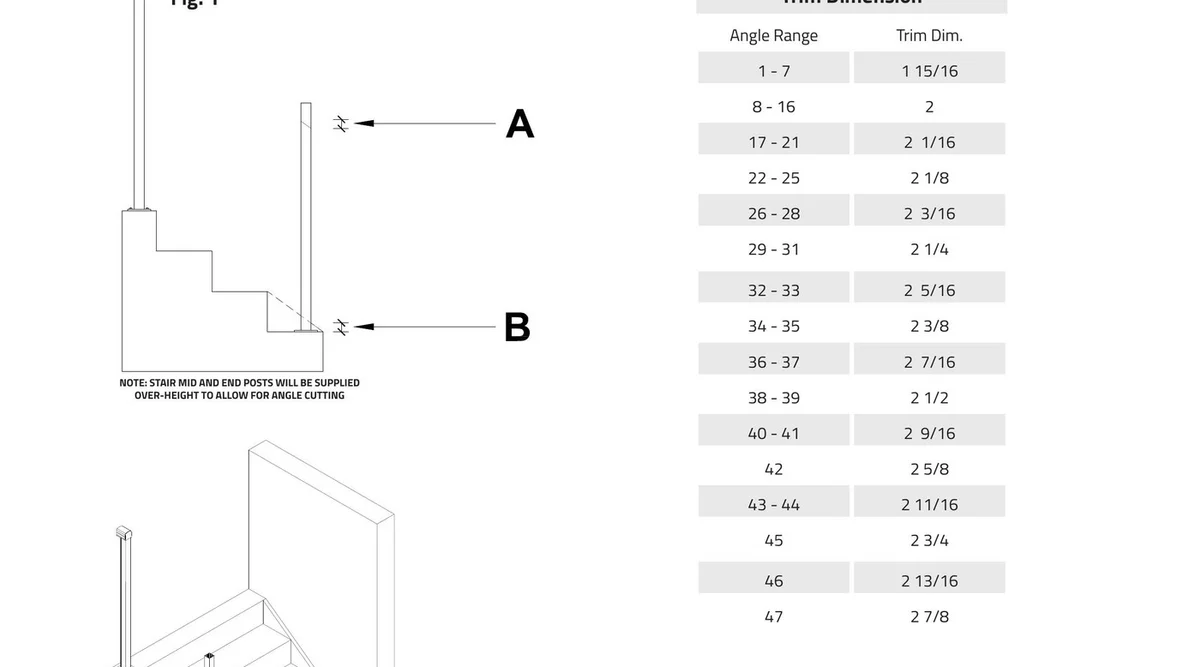
The chart above is from our Flex Rail stair installation guide. Dimension B varies based on where the post sits relative to the stair nosing. Dimension A comes from the trim dimension lookup table based on stair angle. We're currently developing an online calculator where contractors can punch in their angle and post position and get the cut length automatically, but for now, the chart in the installation guide is the reference.
Installing Flex Rail stair panels
Once the posts are cut and set, and the top rail is installed with the flex sleeve positioned at the transition, the stair insert panels go in using the same snap-in method as the level Flex Rail system. Insert the top edge into the recess at the underside of the top rail, engage the nearest locking edge, then angle the panel and straighten it vertically. Apply moderate upward force and pivot until the bottom rail centres on the post and the far locking edge snaps into place. Secure with three #12 x 1-1/2" tek screws from below to reduce rattle and lock the panel in position.
One detail specific to stair panels: the bottom rail has an internal riveted rail that protrudes at the lower end when the panel is tilted to the stair angle. Cut this protruding end while the panel is held at the correct angle, not flat on the ground. The angle matters for a clean fit at the bottom connection.
When to choose Flex Rail stairs
Flex Rail is the right choice when the stairs aren't built yet at the time of ordering, when the stair angle is uncertain or might change during construction, when the contractor wants to order all railing (level and stair) in one batch to avoid a second delivery charge, or when the project involves concrete stairs where the exact angle isn't known until the pour is complete.
It's also the preferred system for multi-family and commercial projects where multiple stair sections at slightly different angles need to be handled efficiently. The multi-family project in Gibsons, BC, installed by Sun Pro Enterprises, used Flex Rail across the entire project for exactly this reason: different stair runs at different angles, all handled with the same adjustable system.
What about glass on stairs?
Glass stair railing is possible and it looks stunning, but it's a different level of complexity and cost. Each glass panel has to be custom-cut to the exact stair angle, the installation typically requires two site visits (frame first, glass second), and frameless glass on stairs is rare because the post tolerances on an angled surface are extremely tight. If your local code requires a graspable handrail on stairs, frameless glass needs a separate applied handrail bolted on, which adds cost and defeats some of the visual purpose. The Whidbey Island project shows exactly this: infinity glass on stairs with a pipe handrail applied because code required something graspable.
We're building a dedicated Glass Stair Railing Guide that covers all of this in detail. For now, if you're considering glass on stairs, talk to your dealer about whether glass component or picket makes more sense for the stair sections of your project.
Stair railing design options
The stair section doesn't have to be an afterthought. The same colour, profile, and mounting options available on the level deck apply to stairs.
Colour: All 14 standard colours and custom colour matching are available for stair panels. The Christina Lake project uses Textured Black across both the level and stair sections, including a gate at ground level. One colour ties the entire project together even when the railing transitions between levels.
Top rail profile: Square, round, colonial, and flat are all available. As discussed in the graspability section, your local code may limit which profiles you can use on the stair sections specifically. Round and colonial are the safest choices if graspability is a concern.
Mounting: Both surface mount and fascia mount work on stairs. Surface mount posts sit on the stair treads. Fascia mount posts attach to the stair stringer. Surface mount is more common on residential stairs. Fascia mount on stairs shows up more on commercial projects with concrete or steel stringers.
Mixed systems: You can run picket on the stairs and glass on the level deck using the same posts, same colour, and same base plates. The Powell River project demonstrates this: picket with colonial top on the stairs (for graspability code compliance), infinity glass on the main viewing area, and privacy picket on the neighbour-facing sections. Three different infill types on one property, all in the same black finish, all looking intentional because the hardware matches throughout.
For more design inspiration: Aluminum Deck Railing Design Ideas
Stair railing cost
Stair railing sections cost more per linear foot than level sections. This is true across every manufacturer, not just us. The reasons are structural: welded picket stair panels are custom-manufactured to a specific angle (they can't be pulled from standard inventory), Flex Rail stair panels use the articulating sleeve system (which adds components), and installation labour is higher because every post needs an angled cut, every panel needs angle verification, and the 6-inch sphere test has to be confirmed at each tread.
For our systems, expect stair sections to add 15% to 25% over the equivalent level section in the same product line. On a typical residential project with one stair run and three sides of level railing, the stair section represents a small portion of the total linear footage but a disproportionate share of the installation time.
Full pricing breakdown: Aluminum Deck Railing Costs in 2026
Ready to plan your deck stair railing? Try our 3D Railing Designer to lay out the stair sections alongside your level deck, or find a dealer who can measure your stairs and recommend the right system for your project.
Frequently asked questions
How tall does deck stair railing need to be?
In Canada, stair guards must be between 865 mm and 1,070 mm (34" to 42") measured from the stair tread nosing. In the US, the IRC requires 34" to 38" from the nosing. The key distinction: stair railing height is measured from the nose of the tread, not the tread surface. The actual post height is taller than the required rail height because the base plate sits on the tread surface, which is lower than the nosing reference point.
What is the 6-inch sphere rule on stairs?
On level deck sections, no opening can allow a 4-inch sphere to pass through. On stairs, there's an additional rule: the triangle formed between the bottom rail, the tread nosing, and the riser face cannot allow a 6-inch sphere to pass through. This triangle exists because the bottom rail follows the stair angle while the treads are horizontal. The bottom rail has to sit close enough to each tread nosing to pass this test.
Does stair railing need to be graspable?
It depends on your municipality. Many building departments require stair handrails to be graspable, meaning your hand can wrap around the profile. Round and colonial top rail profiles meet this requirement. Flat top typically does not. The Powell River, BC project uses colonial on stairs and flat top on the deck for exactly this reason: the local municipality required a graspable stair profile.
What is the difference between welded picket and Flex Rail on stairs?
Welded picket stair panels are factory-welded at a specific stair angle and arrive as a rigid, code-compliant unit. The angle must be known at the time of ordering. Flex Rail stair panels use an articulating sleeve system that adjusts to any stair angle on site, so they can be ordered before the stairs are built. Welded picket is simpler to install. Flex Rail eliminates the scheduling bottleneck where the contractor has to wait for stairs to be built before ordering.
Can I install deck stair railing myself?
Welded picket stair railing is a manageable DIY project if you're experienced with angled cuts and comfortable with aluminum assembly. The panels arrive factory-welded and code-compliant. The main challenges are: angled post cuts with correct screw chase alignment (the #1 installation mistake), confirming the 6-inch sphere test at each tread, and breaking out pickets cleanly where center posts are needed. Flex Rail stairs add the post cut formula and the articulating components. For either system, confirm your local code requirements before starting.
How much does deck stair railing cost?
Stair sections typically cost 15% to 25% more per linear foot than equivalent level sections. The premium covers custom angle manufacturing (welded picket), additional articulating components (Flex Rail), and higher installation labour. On a typical residential project, the stair section is a small portion of the total linear footage but a disproportionate share of the installation time and cost. Full pricing: Aluminum Deck Railing Costs in 2026.