Step-by-step for welded picket, Flex Rail snap-in panels, surface mount vs fascia mount, screw chase alignment, and common mistakes that fail inspection.
This article is part of our complete Aluminum Deck Railing guide.
We've been manufacturing this railing from our Aldergrove, BC plant since 2004. A lot has changed in that time. New powder lines, heavier-wall post options, the Flex Rail system that didn't exist when we started. What hasn't changed is that most installation problems dealers report come down to the same five or six mistakes, and almost all of them happen before a single panel goes in.
This guide walks through how we install our Welded Picket and Flex Rail systems, including stair sections. Glass component and Infinity Topless installation live in a separate guide because the bottom rail prep, glass inserts, and setting blocks follow a different sequence. If you're on a glass project, see our glass component railing installation content.
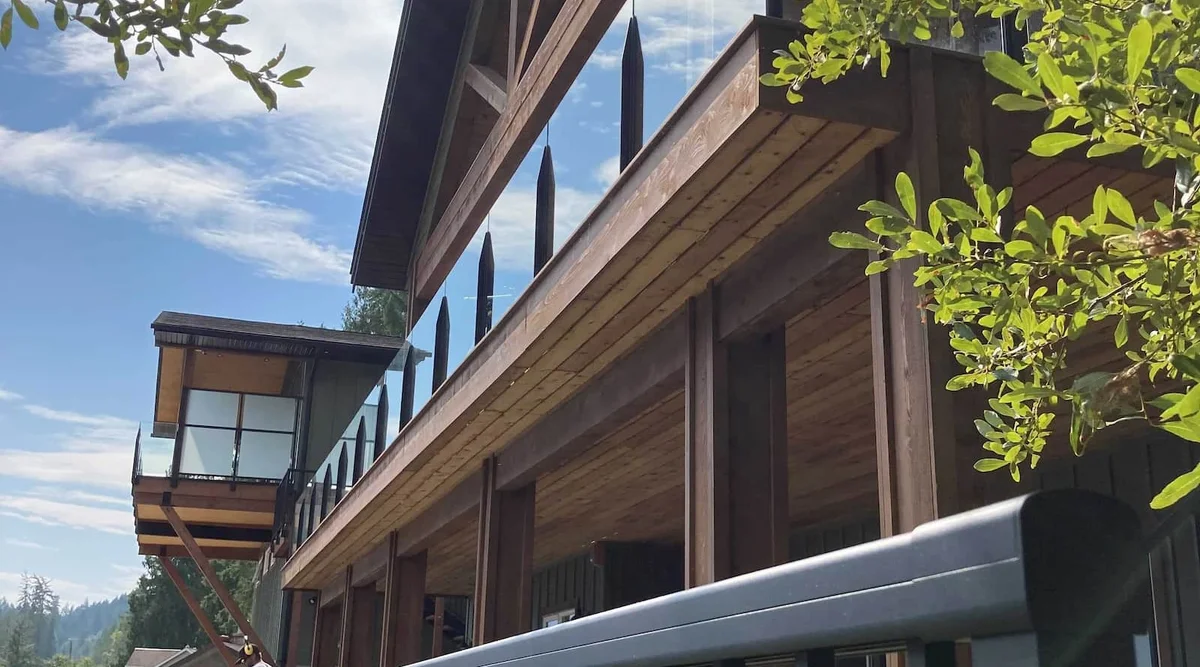
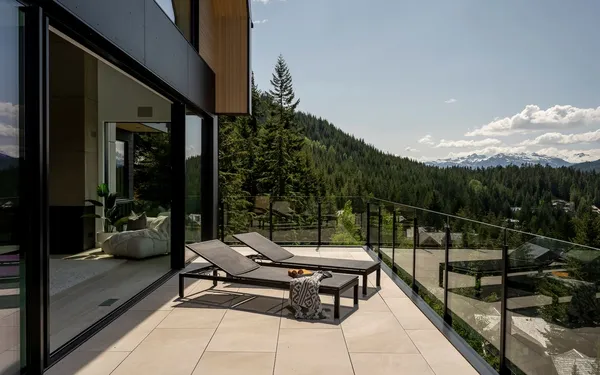
The project above is a good example of what these installation principles look like on a real job site. Grand Forks Deck and Rail ran welded picket on the side elevations and glass component on the water side, from the same crate of posts, with the same base plates and the same Tiger Drylac finish. That cross-compatibility only works if the install sequence is right.
Before you start: the layout work that saves you three trips to the hardware store
The most expensive installation mistakes happen before you turn on the miter saw. Walk the deck twice.
Start by marking every post location. You need a post at every corner, every deck-to-wall transition, every stair nosing, and at even intervals along straight runs. End posts should sit no more than 4 inches from any wall or fixed object because the building code doesn't care how clean your workmanship is if a toddler can fit through a 5-inch gap. Mid posts should be evenly spaced. Our standard layout puts the base plate 1 inch from the deck edge to the edge of the plate, with the post centerline at 3 inches from the edge. Some installers prefer a 2-inch centerline for a tighter look. Either works as long as you're consistent around the whole deck.
Confirm your mounting surface next. Every post needs a structural anchor underneath. Posts fastened into deck boards alone will pull out the first time someone leans on the rail, and inspectors check this. You want joists, blocking, a ledger, or a structural rim joist. If you're fascia mounting and the fascia is just a skirt board over air, open it up and add blocking before you drill.
Finally, confirm rail height against code. The National Building Code of Canada requires guards at 1070 mm (42 inches) on any deck walking surface more than 1.8 m (5 ft 11 in) above adjacent grade, and 900 mm (36 inches) below that. In the United States, the International Building Code Section 1015 requires 42-inch guards where the walking surface is more than 30 inches above grade. For the full breakdown of guard loads, opening limits, and the stair-specific rules that differ from level deck rules, see our deck railing building code guide.
Our 1.72-inch posts are extruded from 6005-T61 aluminum and Intertek-tested to 315 lbs of horizontal applied load on the regular wall version and 555 lbs on the heavy wall version. That satisfies residential guard load requirements under both codes and covers most commercial applications without an upgrade. Top and bottom rails are 6063-T6. Base plates are 4 inches by 4 inches by 3/8 inch thick in 6061-T6. For projects that require engineer-stamped drawings, JCJ Design Engineering provides them on request.
Tools you need
Same list for every system. Nothing exotic. You need a miter saw with a carbide-tipped blade because a standard wood blade will chew the cut and leave a burr you'll regret. Add a power drill, tape measure, level, and an angle finder for any stair sections. Our tek screws are Robertson (square) drive rather than Phillips, so pack #2 and #3 Robertson driver bits along with your standard drill bits. Safety goggles and hearing protection, always. Aluminum cutting is covered under OSHA 1910.95 noise exposure limits, so if you're doing a full day of cutting on a commercial job, rated hearing protection is not optional.
The one rule that applies to every system: screw chase alignment
Every post in our catalogue has an internal screw chase, which is the channel that accepts the fasteners going into the post mount plates, wall mounts, and bottom rail mounts. If you fasten the post to the deck with the screw chase rotated the wrong way, the mount plates won't line up with where the rail needs to go. Your options at that point are to pull the post and reinstall, or to force a connection that won't hold under load. Neither one is a good day.
Before you drill any post to the deck, rotate it so the screw chase faces along the direction of the railing run. Drain holes in the post should face the same direction so water doesn't pool inside and freeze in winter. Every PDF we publish says this. Every dealer install video says this. It is still the number one callback we hear.
Welded picket installation
Welded picket is the most forgiving of our systems. The panels have some flex, tolerances are wider than glass, and one installer can handle a typical residential deck solo. The sequence still matters. Sun Pro Enterprises installed our welded picket at scale on a Gibsons, BC multi-family project, and every run on that build followed the same eight-step sequence diagrammed in our welded picket PDF.
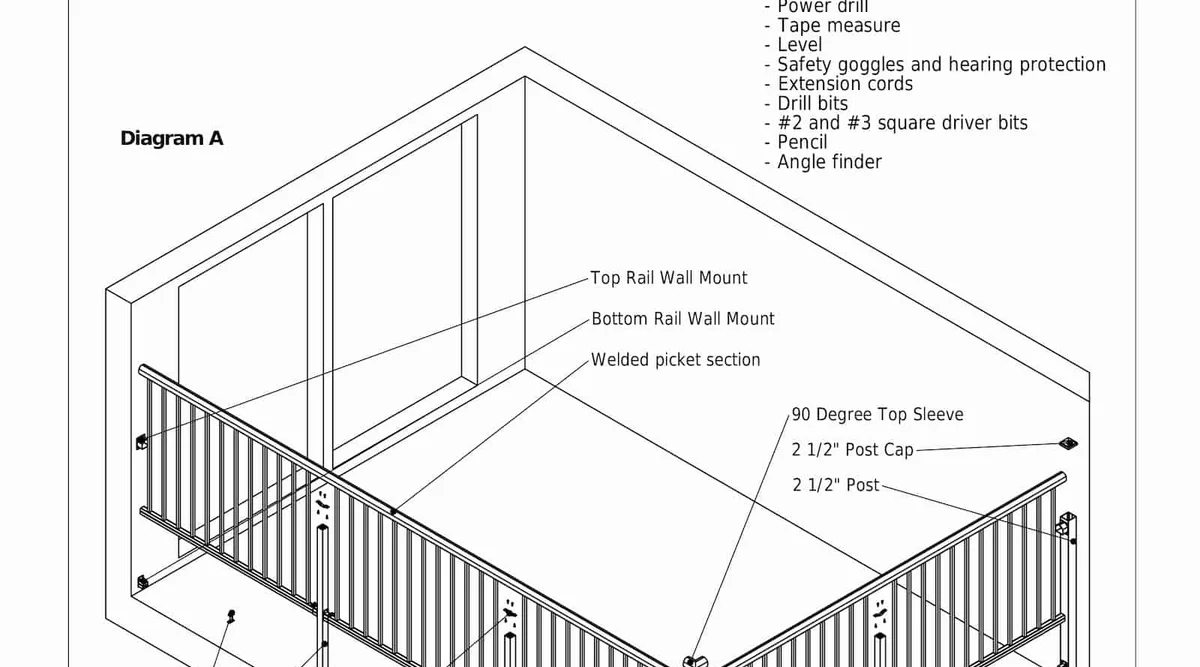
The diagram above names every part that ships in the crate. Work through the install in this order:
Step 1: Prep the posts. Any post that receives a top sleeve gets trimmed down 1/8 inch. Posts that receive a post mount plate stay full height. For a 42-inch rail height, sleeve posts sit at 40 inches and plate posts at 40 and 1/8 inches. The 1/8-inch difference keeps the top rail level across the transition.
Step 2: Install the mount plates. Two #10 x 3/4 inch tek screws per plate, on posts that need them. Do not install plates on posts that will receive a sleeve instead.
Step 3: Position the corner and end posts. Temporarily fasten sleeve posts and end posts to the deck. This lets you measure the actual panel cut sizes before cutting. End posts must land within 4 inches of the wall or fixed object.
Step 4: Cut the panels. Measure each opening between sleeves and between walls and sleeves. Allow 1/2 inch at each end that gets a sleeve so the panel has room to slide in. For each mid post location, you'll cut out a picket from the panel. Cut the bottom rail 1/2 inch from the post edge and break the weld on the top rail. Panels are light enough to do this on a pair of sawhorses.
Step 5: Attach the mid posts to the panel. Slide bottom wall mounts over the bottom rail. Fasten the mid post to the panel through the post mount plate into the top rail with two #10 x 3/4 inch tek screws. Then fasten the bottom wall mount to the post and to the bottom rail.
Step 6: Install top rail wall mounts. At any termination where the panel meets a building wall or a 2.5-inch post, the top rail wall mount carries the connection. Position it by sliding it over the assembled panel and marking where it lands before you drill.
Step 7: Final assembly. Work around the deck fitting panels into position. Slide support legs mid-span with the mount hole facing onto the deck. Fasten every post. Fasten every support leg. Attach all top sleeves.
Step 8: Inspection. Confirm every screw is tight, every sleeve is seated, every support leg is fastened, and no gap anywhere on the run exceeds 4 inches. The 4-inch sphere rule is the number one reason residential deck railings fail inspection in both the International Residential Code Chapter 3 and the Canadian NBC.
Flex Rail installation
Flex Rail uses snap-in insert panels that lock into a channel on the underside of the top rail. We developed this system for a specific problem our dealers kept running into: concrete replacement projects where post locations were fixed by existing pedestals or anchor points, and standard welded picket panels couldn't be custom-cut fast enough to fit irregular spacing. Rail Pro ran into exactly this on a rooftop replacement in the Lower Mainland. The pedestals weren't moving. Flex Rail let them cut the insert panel to whatever width the opening demanded and keep the job on schedule.

The top rail and post mount plate in Flex Rail are shared extrusions with our glass component railing. Dealers who stock both systems can cross-pollinate inventory, which reduces SKU count in the warehouse. That's intentional. After the posts are set, work top-down:
Install the top rail first. Determine your end conditions, which will be a wall mount, an inside sleeve, an end cap, or an end sleeve depending on how the railing terminates. Cut the top rail to length. Fit it into the connecting sleeves and end fittings. Secure with #10 x 3/4 inch tek screws through the sleeve into the post. The top rail carries the weight of the panels, so it has to be level and securely anchored before the panels go in.
Set the mid posts. For each mid post, install a Glass/Flex Rail post mount plate on top with two #10 x 3/4 inch tek screws. Slide the post up under the top rail and align the mount plate with the recess on the underside of the rail. Secure the mount plate to the top rail with two more tek screws. Level the post before you tighten.
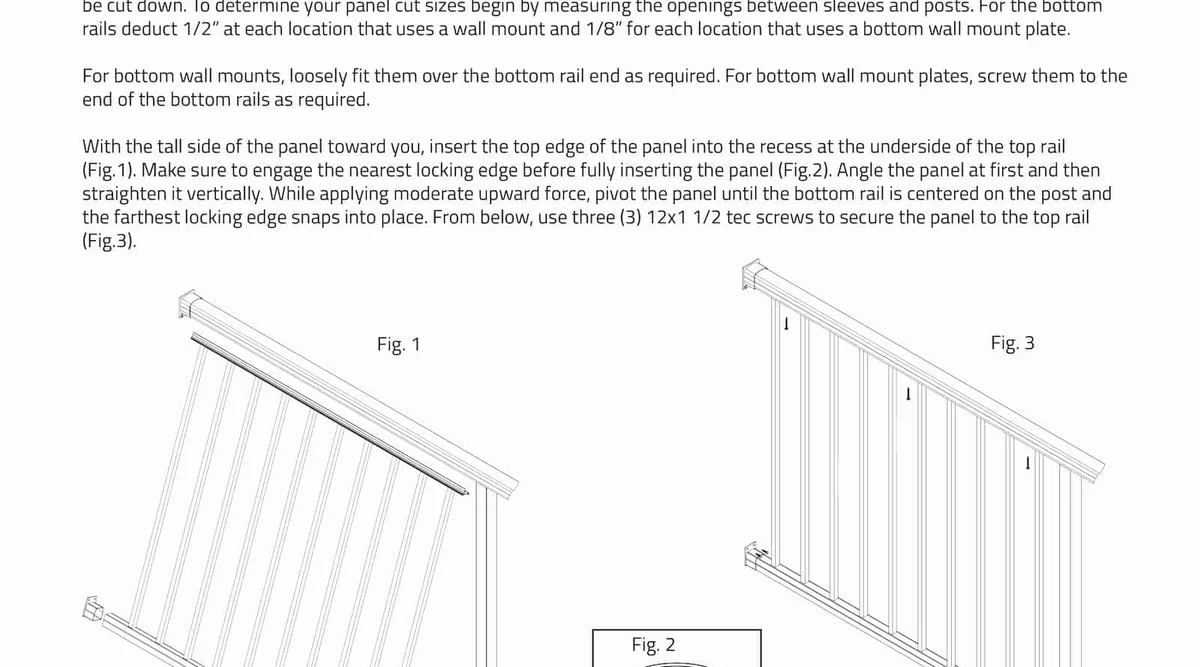
Panel installation is the part that feels strange the first time you do it. With the tall side of the panel toward you, insert the top edge into the recess on the underside of the top rail. Engage the nearest locking edge before the panel is fully inserted. Angle the panel first, then straighten it vertically. Apply moderate upward pressure and pivot the bottom rail until it centres on the post and the far locking edge snaps into place. From underneath, secure the panel to the top rail with three #12 x 1-1/2 inch tek screws.
Panels can be cut down to width when the opening doesn't accept a standard size. Deduct 1/2 inch at each end that uses a wall mount, and 1/8 inch at each end that uses a bottom wall mount plate.
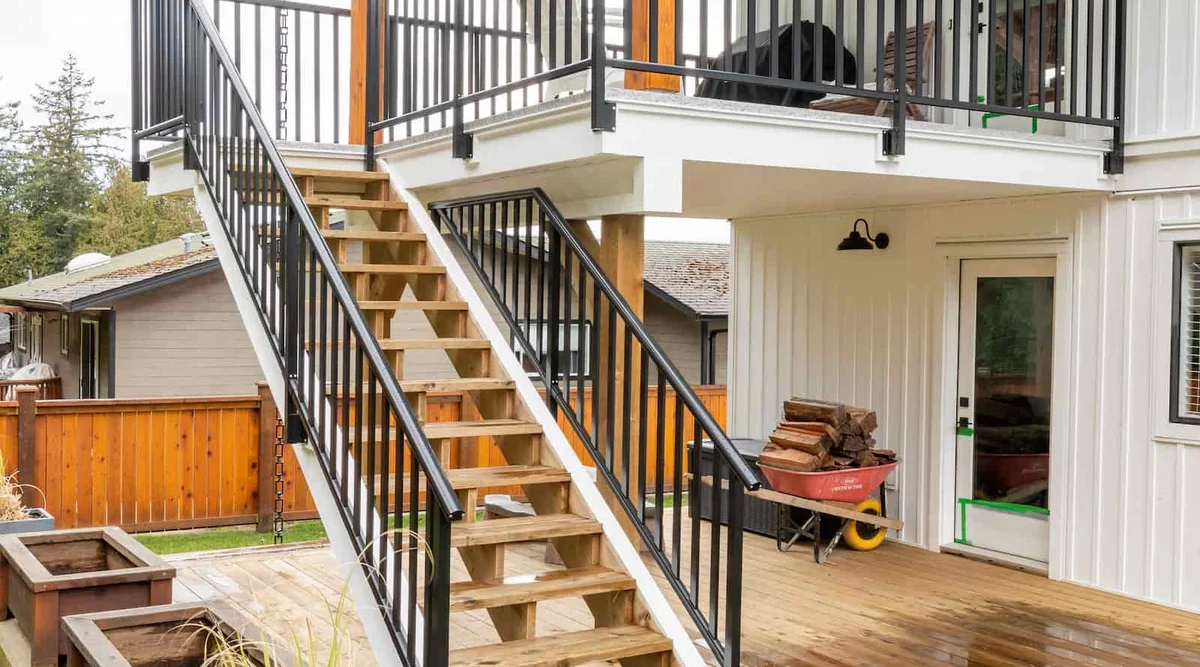
Stair railing installation
Stairs are where most deck projects stall out. The deck gets built first. The stairs come later. The railing contractor can't order material until the stair framing is in, the stringers are cut, and the angle is set. By the time everything lines up, the homeowner has been staring at a deck with no stair railing for three weeks.
The articulating top rail sleeve on our Flex Rail stair system was designed around this problem. The sleeve is a knuckle-style connection that pivots to match whatever stair angle you end up with, so dealers can order stock inventory and adjust on site. Modern Powell River used this system on a 42-to-36-inch transition at the top of a stair run on a Powell River, BC waterfront project.
That transition above is the output. Here is the sequence that produces it.
Step 1: Set the level deck post first. The post at the top of the stair has to be fully fastened before you work on the stair posts downhill. Use an end sleeve with 1-inch mount on the level deck side.
Step 2: Measure the stair angle. An angle finder laid on the stringer gives you the number you need for the trim dimension table. Guessing will put the top rail flex sleeve in the wrong location, and the rail height at the stair nose ends up either short of code or mysteriously tall.
Step 3: Calculate the stair post height. This is the formula that trips up most first-time installers:
Overall stair post height = 36 inches less Dim A, plus Dim B
Dim B is the rise between stair tread noses measured at the post location. Dim A comes from the trim dimension table, which accounts for the angle cut on the post where it meets the top rail flex sleeve.
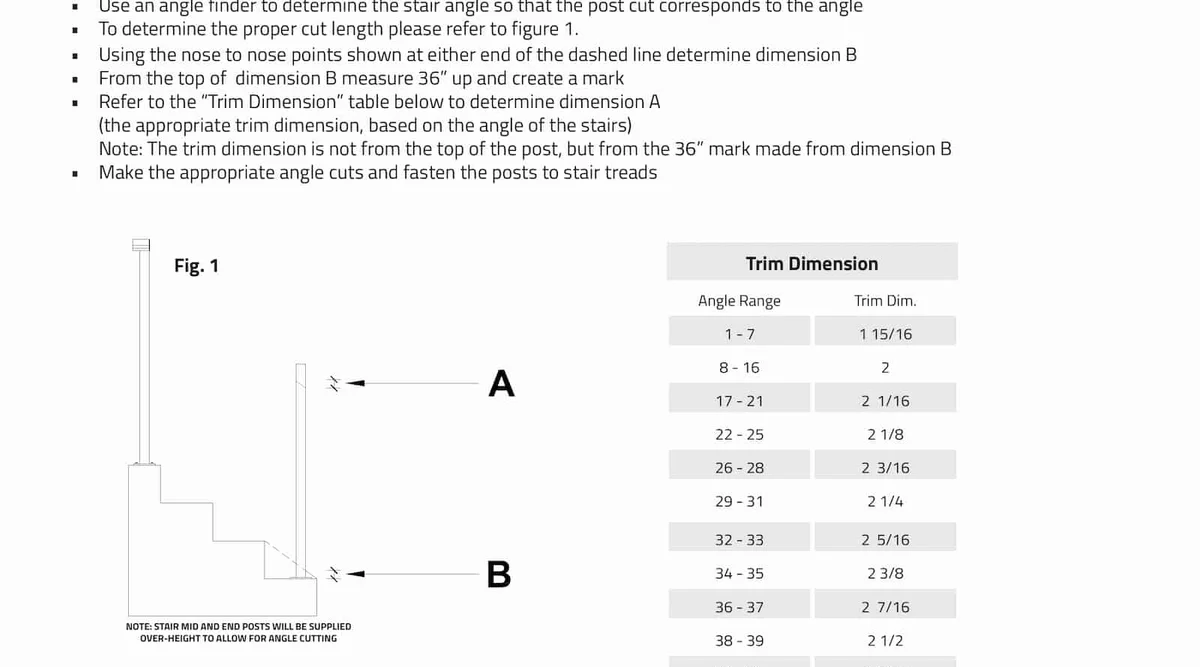
Work the table row by row. The angle you measured in step 2 falls into one of these ranges, and that row gives you Dim A:
Stair angle (degrees)Dim A (trim dimension)1 to 71 and 15/16 inch8 to 162 inches17 to 212 and 1/16 inch22 to 252 and 1/8 inch26 to 282 and 3/16 inch29 to 312 and 1/4 inch32 to 332 and 5/16 inch34 to 352 and 3/8 inch36 to 372 and 7/16 inch38 to 392 and 1/2 inch40 to 412 and 9/16 inch422 and 5/8 inch43 to 442 and 11/16 inch452 and 3/4 inch462 and 13/16 inch472 and 7/8 inch
Stair mid posts and end posts ship over-height from our factory specifically so you have material to work with for the angle cut. Don't trim them to length before you calculate Dim A.
Step 4: Install the stair post mount plate on top of the cut post with two #10 x 3/4 inch tek screws.
Step 5: Locate the top rail flex sleeve. Measure Dim B from the stair tread nose up. Add 36 inches (or your target stair rail height) to get the sleeve location on the post. Mark it.
Step 6: Install the top rail. Cut the top rail at the approximate stair angle so the sleeve captures it cleanly. Slide the flex sleeve over the cut end, add the end cap on the other end, and rest the top rail on the stair post mount plate. Align the flex sleeve to your mark and fasten with tek screws.
Step 7: Cut and install the insert panels. Measure the openings at top and bottom of each panel independently because clearance varies depending on the parts used at the top rail. Deduct 1/2 inch at each end for the adjustable bottom stair sleeve. The lower end of the panel has an internal riveted rail that protrudes when the panel is tilted, so make that cut with the panel held at the final angle.
Stair railings have their own code section worth understanding. The IBC and NBC both require graspable handrails on stairs, and the opening rule on stairs is the 4-3/8 inch sphere rule (not the 4-inch rule used on level decks). For the full stair code breakdown including handrail profile requirements, see our stair railing installation guide.
Surface mount versus fascia mount
Both meet code when fastened to structural framing. The choice comes down to aesthetics and what's available to anchor into.
Surface mount posts sit on top of the deck with a 4-inch by 4-inch by 3/8-inch 6061-T6 aluminum base plate, fastened down through the deck surface into joists or blocking. Simpler to install. Base plate visible. Works anywhere you have solid framing underneath the deck surface.
Fascia mount posts bolt to the side of the deck frame, keeping the deck surface completely clear. The railing looks like it floats at the edge. Cleaner on modern builds. The trade-off is that the fascia has to be structural. A decorative fascia board with an air gap behind it will not hold railing loads no matter what fasteners you use. Open it up and add blocking if you're unsure.
All our welded picket, Flex Rail, glass component, and Infinity Topless systems ship in both mount configurations.
Common installation mistakes that fail inspection
Screw chase rotated wrong. Covered above. The number one callback we hear from dealers.
Posts fastened into deck boards only. Deck boards can't carry guard loads. Code requires attachment to structural framing, and inspectors check this. If there's no joist at your post location, add blocking between joists before you install. The North American Deck and Railing Association publishes contractor guidance on deck connection requirements if you want the industry reference.
Cutting panels or rails flush to the opening. Every sleeve connection needs 1/2 inch of clearance. Cut flush and the rail won't slide in. Measure, deduct, then cut.
Gap over 4 inches at end posts or between pickets. The 4-inch sphere rule is strict. A 4 and 1/8 inch gap fails inspection. Measure with a tape, not by eye.
Stair posts trimmed before calculating Dim A. Posts ship over-height for a reason. Cut after the angle is measured and Dim A is looked up, not before.
Not using an angle finder on stairs. Guessing the stair angle puts the top rail flex sleeve in the wrong location, which means the rail height at the stair nose ends up either short of 36 inches or mysteriously tall. An angle finder costs around $15 at any hardware store. Use one.
Attempting glass panel installation solo. Tempered glass panels are heavy and fragile. Two people minimum for glass. Dropping one is expensive and dangerous. This is why we separate glass installation into its own guide.
Download the full installation PDFs
For step-by-step diagrams on every sequence above, download the full installation guides from the product pages. The Welded Picket guide is an 8-step PDF covering post prep, panel cutting, mid post installation, and final inspection. The Flex Rail guide is a 10-page PDF covering both deck and stair installation, panel insertion, and the snap-in locking detail. Printed copies ship in the crate with every railing order. Dealers can request additional copies through their sales contact.
Need help planning an installation? Our engineering team can confirm your layout, review your drawings, and connect you with a dealer in your area. Find a dealer or contact us.
Frequently asked questions
How do you install aluminum deck railing?
Plan your post locations, confirm structural mounting surfaces, cut posts to length, set the posts with the screw chase aligned to the railing direction, install rails and panels in the sequence specific to your system, and finish with a full inspection for tight fasteners and compliant opening gaps. The detailed sequence varies between welded picket, Flex Rail, and glass systems, but the universal rules (solid anchor, screw chase alignment, 4-inch sphere rule) apply everywhere.
Can I install aluminum deck railing myself?
Welded picket and Flex Rail are DIY-friendly with a miter saw, drill, level, tape measure, and angle finder. Glass railing is strongly recommended for professional installation because post alignment tolerances are tighter and the panels are heavy, fragile, and expensive to replace if damaged on site.
How do you attach aluminum deck railing posts?
Posts mount with a 4-inch by 4-inch by 3/8-inch aluminum base plate (surface mount) or with fascia brackets (fascia mount). Fasteners must anchor into structural framing, which means joists, blocking, or a structural rim joist. Posts fastened into deck boards alone will not pass inspection and will not hold guard loads.
What is the difference between fascia mount and surface mount deck railing?
Surface mount posts sit on top of the deck with a base plate screwed down into framing. Fascia mount posts bolt to the side of the deck frame. Both meet code when properly attached to structural framing. Fascia mount keeps the deck surface clear and looks cleaner on modern builds. Surface mount is simpler and works anywhere you have solid framing under the deck surface.
How do you install aluminum stair railing?
Use an angle finder to measure the stair angle, calculate the stair post height using the formula (36 inches less Dim A, plus Dim B), make the angle cut on the over-height post, install the stair post mount plate, locate the top rail flex sleeve at 36 inches above the stair tread nose, and install the insert panel cut to match the opening at both top and bottom independently. Our Flex Rail stair system uses an articulating top rail sleeve that adjusts to any angle between 1 and 47 degrees.
What tools do I need to install aluminum deck railing?
A miter saw with a carbide-tipped blade, a power drill, a tape measure, a level, an angle finder for stair sections, #2 and #3 Robertson square driver bits, drill bits, safety goggles, and hearing protection. No welding and no specialty fabrication equipment required.