Walk into any big-box store and you’ll find deck railing kits stacked on pallets — a box of parts with vague instructions and hardware that may or may not hold up to your local building code. That approach works for a garden border. It doesn’t work for something that’s supposed to stop a person from falling off a second-story deck.
Aluminum deck railing is a system of engineered components. Each part has a specific job, and how those parts connect to each other determines whether your railing passes inspection, handles the loads your building code demands, and still looks good 25 years from now. This guide breaks down every component in the system — what it does, what it’s made of, and what actually matters when you’re specifying railing for a real project.
Parts of a deck railing: how the system fits together
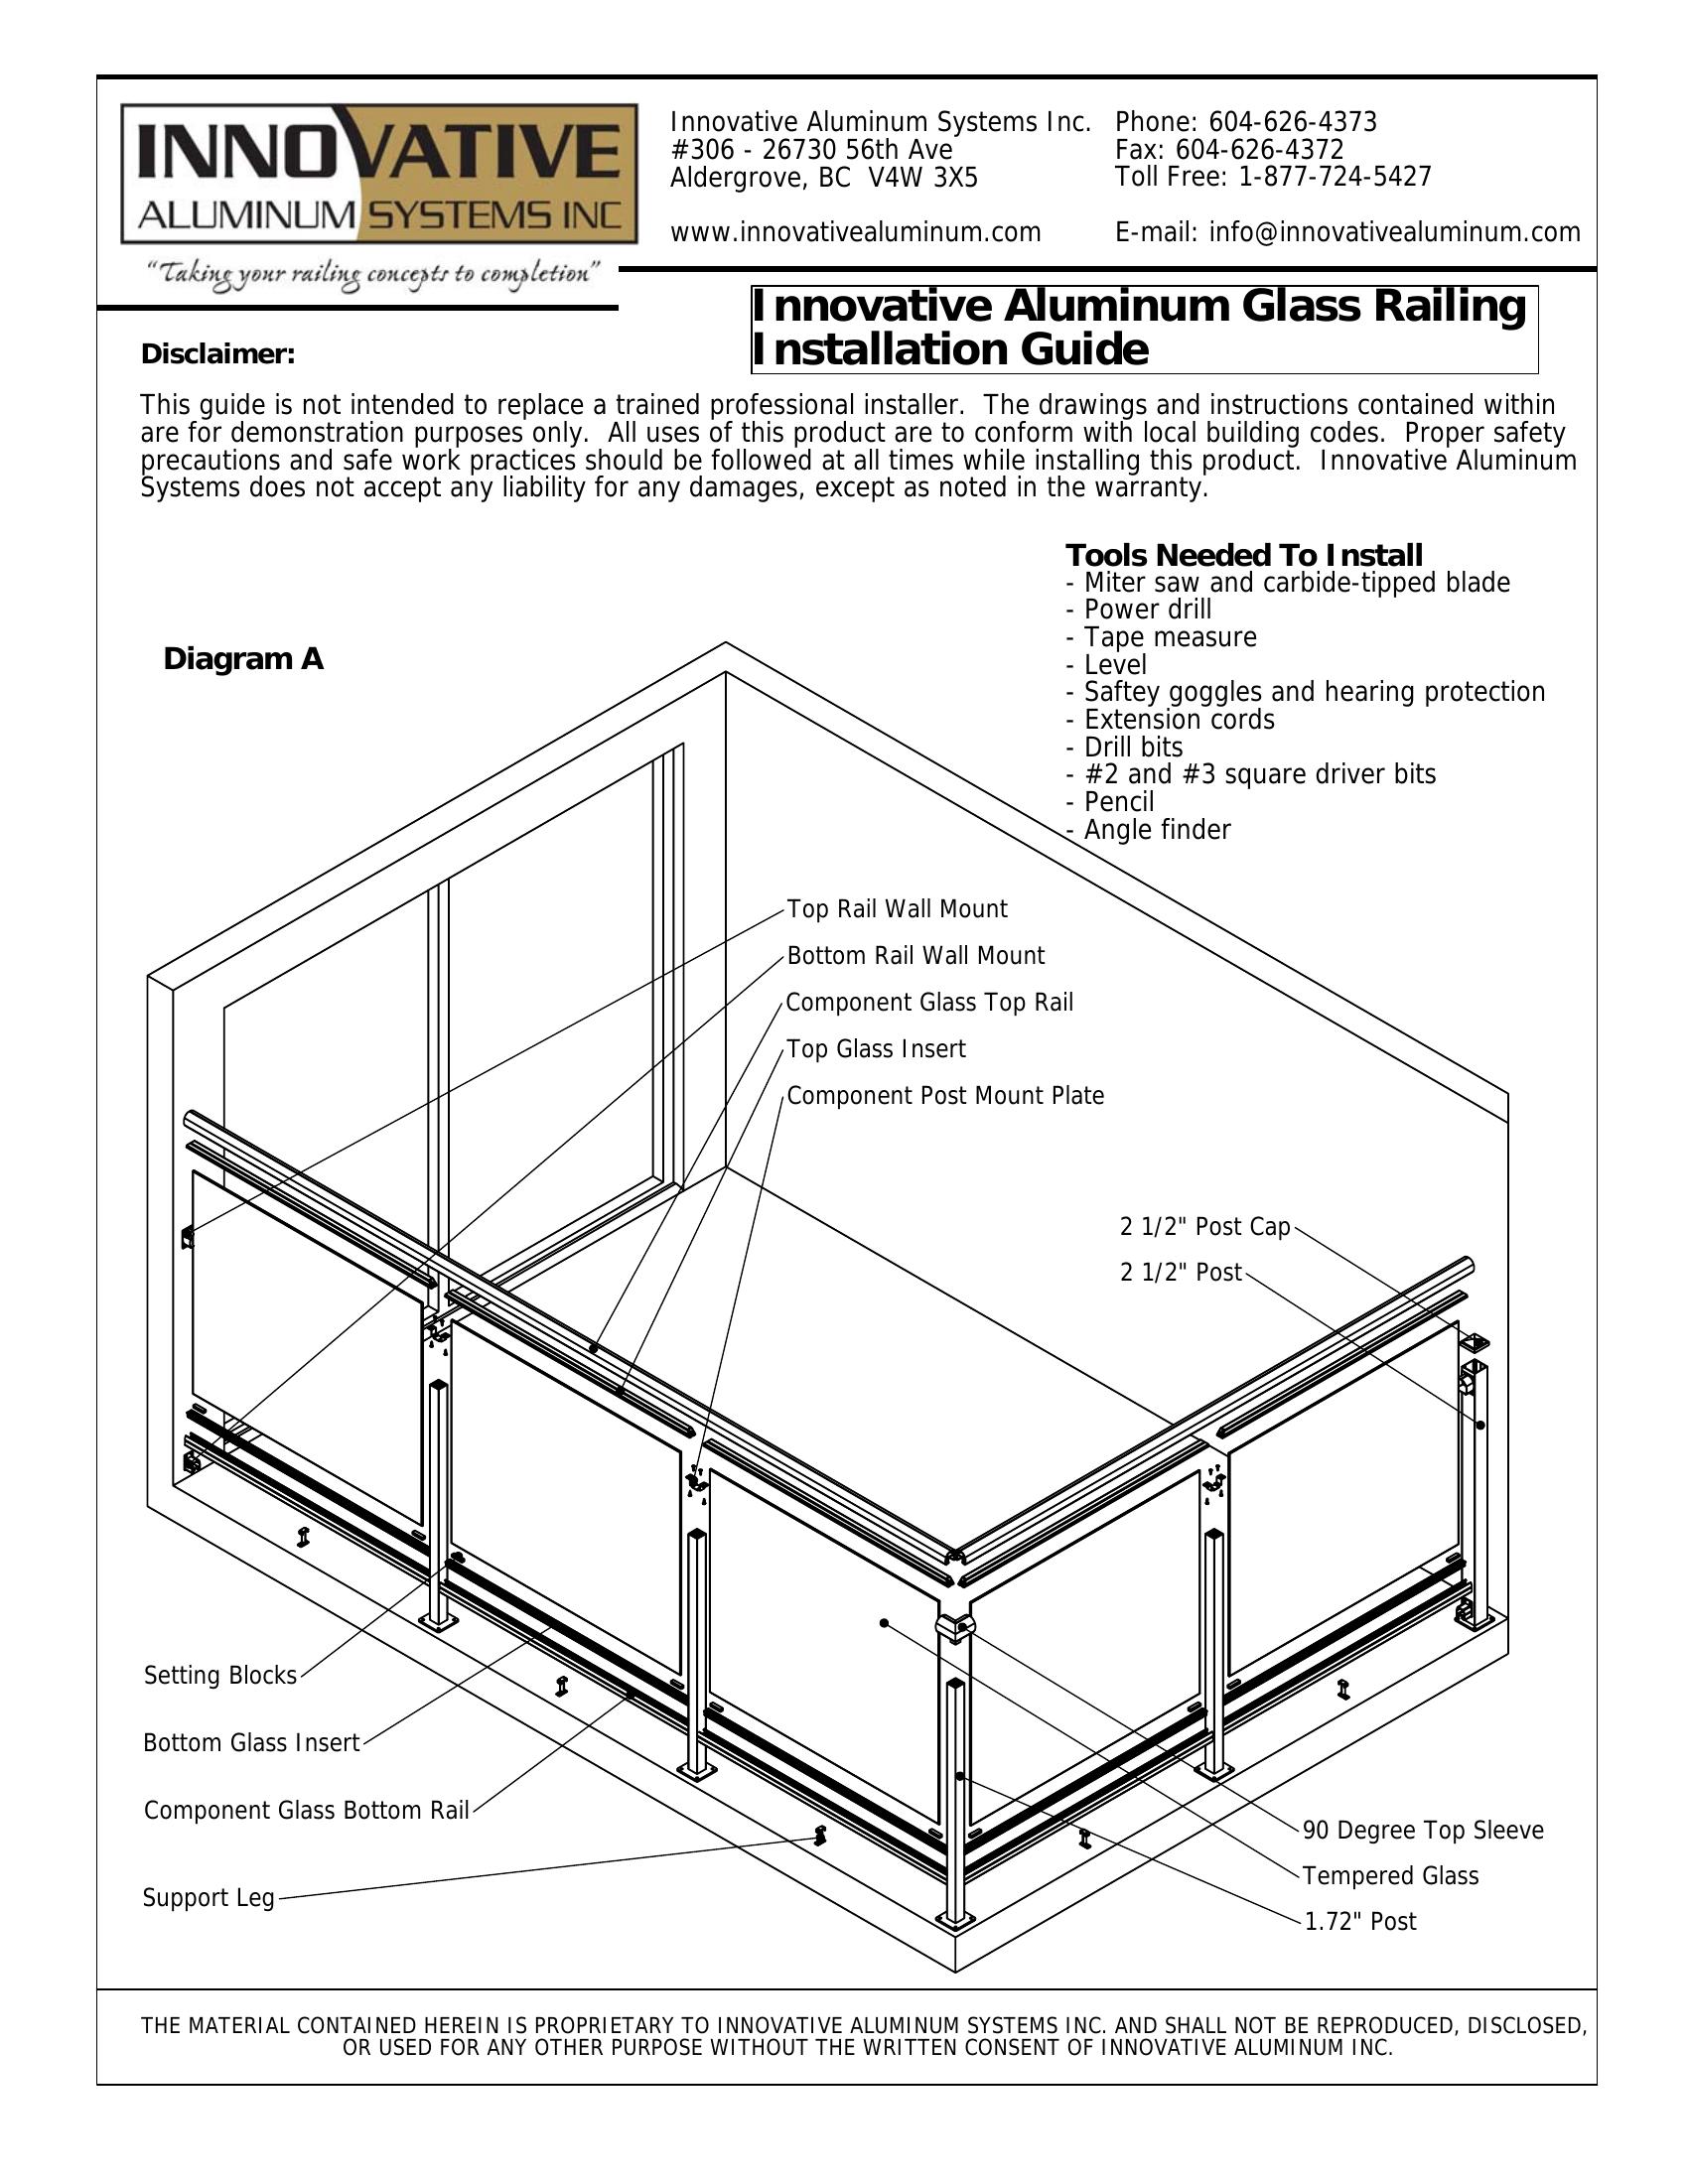
Whether you’re looking at glass panel railing or aluminum picket railing, the structural frame is the same. A continuous top rail runs over a series of posts. A bottom rail connects the post bases with a small clearance above the deck surface. Infill material — either tempered glass or pickets — spans between those two rails. And posts attach to the deck through base plates or fascia brackets.
That sounds simple, but the engineering lives in the details of each connection. Here’s how the load path actually works: when someone leans against your railing, force travels from the top rail into the nearest posts, down through the base plate or bracket connection, and into your deck structure. Every component in that chain has to handle the load. A railing is only as strong as its weakest link, and in our experience, the weakest link is almost always the connection to the deck — not the railing itself.
The parts break down into three categories. Structural components — posts, top rail, bottom rail — carry the loads your building code requires. Infill — tempered glass or aluminum pickets — prevents passage between the rails. And connection hardware — base plates, post mount plates, rail clips, wall mounts, brackets, support legs, and fasteners — ties everything together and anchors the system to the building. Most people spend their time thinking about the first two categories and barely consider the third. That’s a mistake.
Deck railing posts: the hardest-working part of the system
Posts do more structural work than anything else in your railing. They’re cantilevered — fixed at the base and free at the top — which means every pound of horizontal force at the top rail gets multiplied into a much larger bending moment at the base. A person leaning against a 42-inch-tall post creates serious stress at that base connection, which is why post material, wall thickness, and mounting hardware matter more than most people realize.
What the posts are made of
Not all aluminum is the same. There are dozens of alloys and temper designations, and the one your post is extruded from directly affects how much force it can handle. Our posts use 6005-T61 aluminum — a structural alloy with a tensile yield strength of 241 MPa (about 35,000 psi). For context, that’s roughly 40% stronger than the 6063-T6 alloy you’ll find in window frames and architectural trim. The T61 temper means the material has been solution heat-treated and artificially aged for maximum strength.
Why does this matter to you? Because a post’s load capacity comes from the combination of its material strength and its cross-section geometry. A post made from a weaker alloy needs thicker walls to carry the same load, which means more weight and more material cost. A stronger alloy lets you use a more efficient cross-section.
Regular wall vs heavy wall posts
We manufacture two post extrusions from the same 1.72-inch square profile. The regular wall post has a wall thickness of 0.070 inches. The heavy wall post is 0.235 inches thick — more than three times the wall of the standard post. Both are the same exterior dimension, so they use the same brackets, base plates, and rail connections.
In load testing conducted by Intertek, the regular wall post handled 315 pounds applied at the top before reaching its limit. The heavy wall post handled 555 pounds — a 76% increase in capacity. That extra capacity shows up in the post spacing tables: heavy wall posts can be spaced further apart, which means fewer posts, fewer base connections, and a cleaner look for the same structural performance.
When do you actually need heavy wall posts? Three scenarios come up most often: wide post spacing on long runs where you want to minimize the number of posts, high wind exposure where lateral pressure on glass infill adds to the code loads, and taller-than-standard guards where the increased lever arm puts more stress on the base connection.
Post types by position
Beyond wall thickness, posts are configured differently depending on where they sit in the run. End posts terminate a railing section and have bottom rail connections on one side only. Mid posts sit between two sections with connections on both sides. Corner posts (90-degree) join two perpendicular railing runs. Each type uses the same extrusion — the difference is in how the bottom sleeves or rail clips are installed.
Surface mount vs fascia mount: two ways to attach posts to the deck
This is one of the biggest decisions in any railing project, and it affects everything from the look of the finished installation to the structural requirements of your deck framing.
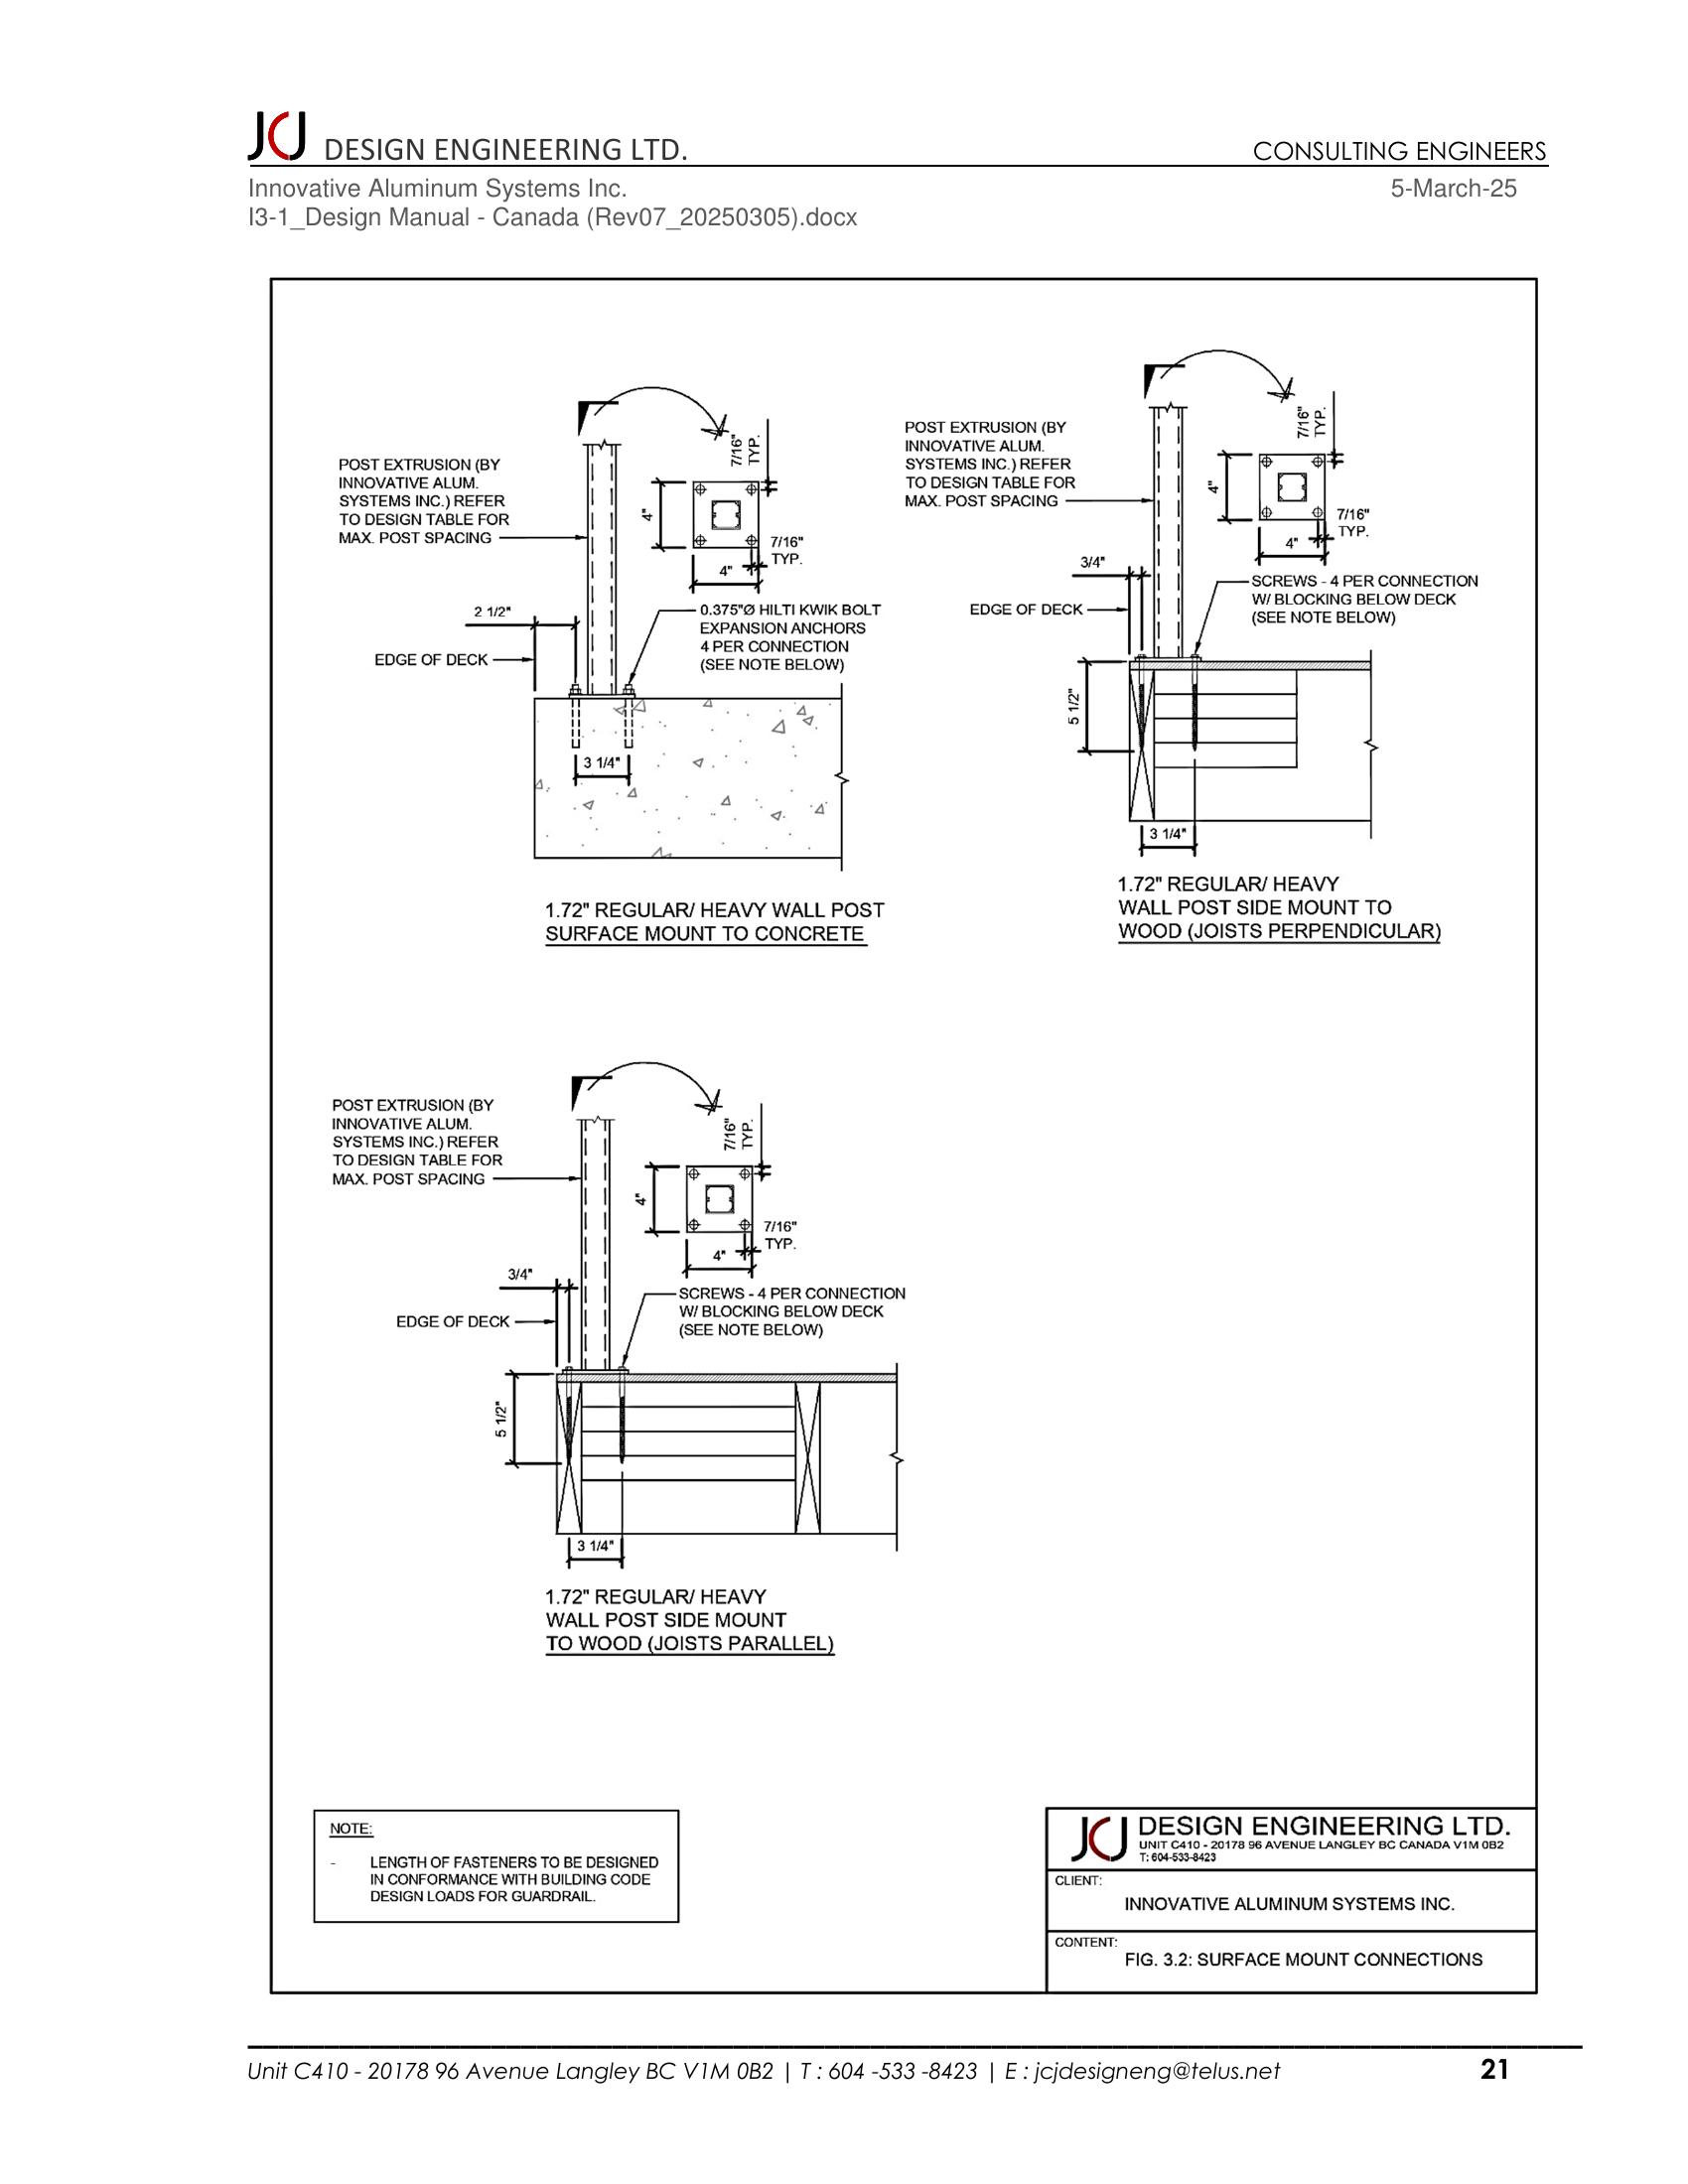
Surface mount (top mount) posts sit on top of the deck surface. The post connects to a 4-inch by 4-inch base plate that’s 3/8-inch thick, extruded from 6061-T6 aluminum. Four anchor bolts go through the base plate and into the deck structure below. For concrete, those are typically 3/8-inch Hilti Kwik Bolt expansion anchors. For wood framing, they’re structural screws into solid blocking — not just through the decking boards. The decking alone won’t hold.
Fascia mount (side mount) posts attach to the side of the deck structure using a 5-inch-tall fascia bracket. This puts the entire railing outboard of the deck surface, which gives you full use of the deck area right up to the edge. The trade-off is that all the load goes into the fascia board and the framing behind it, so you need solid backing — a rim joist or 3-ply 2×10 blocking at minimum. Fascia mounting into plywood alone is a code violation waiting to happen.
Which one should you use? Surface mount is more forgiving structurally because the base plate distributes force across a larger area and the anchors resist in tension (pulling straight up), which is a reliable load path. Fascia mount looks cleaner and gives you more deck space, but the anchors are loaded in shear and tension simultaneously, and the backing structure has to be specifically designed to handle it. If your deck framing wasn’t built with fascia-mounted railing in mind, surface mount is the safer bet. Talk to your dealer about what your specific deck structure can support.
How far apart should deck railing posts be?
This is one of the most common questions we get, and the answer isn’t a single number. Maximum post spacing depends on the post type (regular or heavy wall), the mounting method (surface or fascia), whether the top rail ends are free-standing or connected to the building, and how many posts are in the run.
Here are the general ranges for our system at standard 42-inch guard height with code-required loads under the National Building Code of Canada and IBC:
Surface mount, regular wall posts: maximum spacing ranges from 7′-6″ for a single-span free-standing section down to about 3′-10″ for longer runs with 7+ posts. When the top rail is restrained (connected to the building at one or both ends), spacing increases — a two-post restrained section can hit 7′-2″ per span, and even a 7-post restrained run allows 3′-10″ spacing.
Surface mount, heavy wall posts interspersed with regular wall: spacing jumps significantly. A two-post free-standing section can reach 7′-1″ per span, and longer runs with heavy wall corner posts can maintain 6′-0″ spacing even with 7+ posts.
Fascia mount, regular wall posts: slightly tighter spacing than surface mount due to the different load path. A single free-standing section maxes out at 7′-6″, and longer runs settle around 3′-6″ per span.
These numbers come from our engineering design manual, which is based on a combination of structural analysis per CSA S157 and Intertek load test results. They’re certified by a professional engineer for compliance with the 2020 National Building Code of Canada and the 2024 BC Building Code, among others. If your local jurisdiction uses different load requirements, or if you’re dealing with high winds on glass infill panels, the spacing needs to be adjusted. We publish wind adjustment tables for exactly that scenario.
The point is that post spacing isn’t something to guess at. It’s engineered, and it varies by configuration. Your dealer can look at your deck layout, pull from these tables, and give you the exact post count and placement.
Aluminum balusters and pickets
Balusters — also called pickets or spindles — are the vertical infill elements that fill the space between the top and bottom rail. In aluminum railing, they’re typically 5/8-inch square bars extruded from 6061-T6 aluminum. That alloy designation matters: 6061-T6 has a yield strength of 240 MPa (about 34,800 psi), which means each individual picket can handle the 0.5 kN (112 lbs) concentrated load that building codes require on any individual guard element.
Spacing between balusters is governed by the 4-inch sphere rule. No opening in the guard can allow a 4-inch sphere to pass through. In practice, this means baluster spacing (measured from inside edge to inside edge) has to be less than 4 inches. For 5/8-inch square pickets, a center-to-center spacing of about 4-5/8 inches gives you the maximum allowable gap. Go tighter for a denser look — it’s an aesthetic choice as long as you stay within code limits.
Our system uses two picket configurations. Welded picket panels have the pickets factory-welded to the top and bottom rails, creating a rigid one-piece panel that slides into place between posts. Flex rail insert pickets use a punched bottom rail and a top rail insert channel — individual pickets snap into pre-punched holes, which makes field adjustments easier and allows for panel replacement without welding.
If you’re choosing between glass and pickets for your infill, take a look at our design ideas guide and the full aluminum deck railing overview to compare the look and cost difference.
Top rails and bottom rails

Top rail profiles
The top rail runs continuously over the posts and is the part people actually touch and lean on. It needs to be comfortable to grip, stiff enough to transfer loads between posts without excessive deflection, and compatible with whatever infill you’re using. Our top rails are extruded from 6063-T6 aluminum — a different alloy than the posts, selected for its excellent extrudability and surface finish while still providing plenty of strength for the bending loads a top rail experiences.
We offer four profiles: square, round, colonial, and flat. Each is available in both glass-infill and picket-infill versions — the channel geometry on the underside differs to accommodate different infill attachment methods. The glass-infill top rail has a wider channel that accepts a top glass insert, while the picket version has a narrower slot for the picket insert channel.
In load testing, the top rail carried 500 pounds at midspan on a 72-inch simple span. That’s well above what building codes require and gives the system significant reserve capacity for distributing loads across multiple posts — which is exactly what happens when someone pushes against the railing between two posts.
Bottom rails
The bottom rail connects the post bases, carries the weight of the infill, and maintains the clearance gap above the deck surface. For glass infill, the bottom rail has a channel that holds the bottom glass insert and setting blocks — small rubber blocks that support the glass panel’s weight and keep it centered. For picket infill, the bottom rail is either a smooth component rail (used with flex rail insert pickets) or a WP punched rail with pre-punched holes for welded panels.
A support leg clips into the bottom rail midway between posts to prevent sagging under the weight of the glass or pickets. The support leg also fastens to the deck surface, adding a third point of attachment between the railing system and the structure.
Brackets, base plates, and connection hardware
This is the category where quality differences between railing manufacturers become most obvious. You can have the strongest posts and the stiffest top rail on the market, and it means nothing if the connection hardware can’t transfer the load. Here’s what’s in the system:
Base plates — 4″ x 4″ x 3/8″ thick, extruded from 6061-T6 aluminum. The post connects to the base plate through 4 corner screws (#14) and 2 mid-face screws (#10), creating a rigid connection that transfers the full bending capacity of the post into the base. The base plate then bolts to the deck structure with four 3/8-inch anchor bolts. Each anchor has to resist up to 1,890 pounds of tension on a regular wall post, and up to 3,330 pounds on a heavy wall post. That’s why the backing structure under your deck surface matters — those loads go straight into whatever the bolts are biting into.
Post mount plates — small aluminum plates that screw to the top of posts using #10 x 3/4″ tek screws, creating the connection point for the top rail. Any post that doesn’t get a top sleeve needs a post mount plate. The top rail then fastens to the mount plate from the underside, keeping all screws hidden from view.
Rail clips and bottom wall mounts — these attach to the posts and hold the bottom rail in position. Rail clips are screwed on with #10 x 1-1/2″ stainless steel screws; bottom wall mounts are the alternative for wall-terminated ends. Getting the screw chase alignment right during installation is critical — if the clips aren’t aligned with the rail direction, the bottom rail won’t seat properly and you’ll be re-doing the work.
Top sleeves (90-degree) — round aluminum sleeves that cap the top of corner posts where two perpendicular rail sections meet. The sleeve covers the joint and creates a smooth transition. Posts receiving a top sleeve get trimmed 1/8 inch shorter than posts with mount plates to keep the finished rail height consistent across the entire run.
Wall mount brackets — used wherever the rail terminates into a building wall instead of a post. They bolt to the wall structure (not just the siding) and provide a fixed end condition for the rail. When both ends of a run are wall-mounted, the system behaves as “restrained,” which qualifies for wider post spacing because the wall connections help distribute the load.
Fascia brackets — 5-inch-tall L-shaped brackets for side-mount installations. Each bracket uses four bolts into the framing and connects to the post through the same screw pattern as the base plate.
All connection hardware is powder coated to match the posts and rails. The finished installation looks like one continuous system rather than a collection of parts bolted together.
Deck railing kits vs engineered component systems
If you search for “deck railing kits,” you’ll find products from big-box retailers that come in a box with a fixed post spacing (usually 6 or 8 feet), a set number of balusters, and generic mounting hardware. These kits work for straightforward, single-run installations where the deck layout happens to match the kit dimensions. They’re designed to be approachable for a homeowner with a drill and a free weekend.
An engineered component system works differently. Every project starts with the actual deck — the measurements, post locations, corner conditions, wall terminations, and mounting surface. The dealer designs the system around your specific layout using post spacing tables from the manufacturer’s engineering design manual. Posts are cut to the right height for your deck. Rails are cut to the exact opening size. Glass panels are ordered to fit each opening.
The result is a railing system that fits your deck exactly, is certified to meet your local building code at the actual post spacing used, and comes with engineering documentation that an inspector can review. The trade-off is that you’re working with a dealer instead of grabbing a box off a shelf. For a simple 10-foot run on a low deck, a kit might work. For anything involving corners, stairs, multiple levels, glass infill, or code-driven inspections, you want a system that was designed for your project.
We don’t sell parts direct to homeowners — our system is available exclusively through our authorized dealer network across North America. The dealer handles measurement, design, ordering, and typically installation as well. If you’re in the planning stages, contact us and we’ll connect you with a dealer in your area.
What to look for when comparing railing systems
Not every manufacturer publishes the kind of engineering data we’ve laid out in this guide, and that should tell you something. When you’re evaluating aluminum railing for a project, here’s what to ask:
What alloy are the posts? If the answer is 6063-T6, that’s a softer architectural alloy. It works, but the posts need thicker walls or closer spacing to match the capacity of a structural alloy like 6005-T61 or 6061-T6.
Has the system been load tested? Calculations are a starting point, but actual load testing by an accredited lab (like Intertek) confirms that real-world performance matches the math. Ask for the test report number.
Is there a design manual with post spacing tables? A manufacturer that can hand you an engineer-stamped design manual with spacing tables for different configurations is one that’s done the work. If someone just says “space the posts at 6 feet” with no engineering backup, that’s a red flag.
What’s the expected lifespan, and what’s the warranty? Aluminum doesn’t rust, but the powder coat finish quality determines how the railing looks over time. Ask about the coating specification — AAMA 2604 is the benchmark for high-performance architectural coatings.
What building codes has the system been certified for? Our system is certified for the 2020 National Building Code of Canada, the 2024 BC Building Code, and the 2021 International Building Code (IBC) used across the United States, among others. That covers most jurisdictions in North America. If a manufacturer can’t tell you which codes their system complies with, keep looking.
Frequently asked questions
What are the parts of a deck railing called?
The main structural parts are posts, the top rail, and the bottom rail. The infill between the rails is either tempered glass panels or aluminum pickets (also called balusters or spindles). Connection hardware includes base plates, post mount plates, rail clips, wall mount brackets, fascia brackets, support legs, and fasteners. Together these form the complete guard system.
How far apart should deck railing posts be?
It depends on the post type, mounting method, and run configuration. For standard 42-inch guards with regular wall surface-mount posts, spacing ranges from about 3′-10″ to 7′-6″. Heavy wall posts allow wider spacing. The numbers should come from the manufacturer’s engineering tables, not a guess — building codes require specific load capacity that’s directly tied to spacing.
What’s the difference between surface mount and fascia mount railing posts?
Surface mount posts sit on top of the deck and bolt through a base plate into the structure below. Fascia mount posts attach to the side of the deck using brackets bolted into the rim joist or blocking. Surface mount is more forgiving structurally. Fascia mount gives you more usable deck space and a cleaner edge but requires solid framing behind the fascia board.
Can I buy individual aluminum railing parts?
Our railing system is available through authorized dealers rather than as individual parts sold direct to consumers. Each project is designed around your deck layout using engineering post spacing tables, and components are cut and ordered to fit. This ensures the finished railing meets building code at the actual spacing used. Contact us to find a dealer near you.
What aluminum alloy is used in deck railing posts?
Our posts are extruded from 6005-T61, a structural aluminum alloy with a tensile yield strength of 241 MPa (35,000 psi). Top and bottom rails use 6063-T6 aluminum. Base plates use 6061-T6. Each alloy is selected for the structural demands of that specific component — cheaper systems often use 6063-T6 for everything, including posts, which has about 30% less yield strength.
How much weight can an aluminum deck railing post hold?
Our regular wall post (0.070″ thick) was load-tested to 315 pounds applied at the top of a 42-inch post. The heavy wall post (0.235″ thick) handled 555 pounds. Both were tested by Intertek under AC273 acceptance criteria. These capacities well exceed the minimum building code requirements, giving the system a meaningful safety margin.
Do aluminum deck railing kits meet building code?
Some do, some don’t — it depends on the specific kit and the code in your area. A kit with fixed 6-foot post spacing might be fine under one code but fall short under another. Engineered component systems come with post spacing tables certified by a professional engineer for specific building codes. If your project requires a permit, make sure whatever railing you choose has the documentation to prove compliance at the spacing actually installed on your deck.