This article is part of our complete Aluminum Deck Railing guide.
Installing aluminum deck railing is a structured, step-by-step process — not a weekend improvisation. Unlike wood railing, which gets built piece by piece on site, aluminum systems arrive as precision-manufactured components that fit together in a specific sequence. Get the sequence right and the install goes smoothly. Skip a step or misalign a post, and you’ll spend more time fixing problems than you would have spent doing it properly.
This guide covers the planning, tools, and key installation concepts for our three main railing systems — Welded Picket, Glass Component, and Flex-Rail. Full step-by-step installation instructions with diagrams are available as downloadable PDFs at the bottom of this page.
Before you start: planning the layout
The most common installation mistakes happen before a single post is drilled. Planning the layout correctly eliminates 90% of on-site problems.
Walk the deck and identify every post location. You need posts at every corner, at every transition (deck-to-stair, deck-to-wall), and at regular intervals along straight runs. Center posts should be evenly spaced. End posts should be no more than 4 inches from any wall. Note every location where you’ll need a corner post, an end post, or a mid post — they’re different components.
Confirm your mounting surface. A solid structural mounting surface is required at every post location. Posts cannot be fastened only to deck boards — they need to anchor into the deck’s structural framing (joists, blocking, or ledger). If you’re fascia mounting, confirm the rim joist or fascia board is structural. If it’s a decorative fascia over a gap, you need blocking behind it.
Choose your mounting method. Surface mount posts sit on top of the deck with base plates (standard 4″ x 4″ x 3/8″) screwed down into the structure. The standard post centerline is 3 inches from the deck edge. Fascia mount posts attach to the side of the deck frame, keeping the full deck surface clear and giving a cleaner floating look. Both meet code when properly fastened.
Confirm your rail height. Common heights are 36″ or 42″. Your local building code determines the minimum. In Canada, 42″ is required on decks above 1.8 m. Posts are typically cut to 40″ (for 42″ rail height) to account for the top sleeve or mount plate adding the final 2 inches.
Check for slope. Decks aren’t always level. Posts may need shims underneath to keep the railing level on a sloping surface. Identify this early — shimming after the railing is assembled is much harder.
Tools you’ll need
The tool list is the same across all our systems. No welding or specialty equipment required — if you can cut, drill, and measure, you have what you need.
| Tool | What it’s for |
|---|---|
| Miter saw with carbide-tipped blade | Cutting aluminum rails and posts to length. Carbide-tipped is non-negotiable — standard wood blades won’t cut clean. |
| Power drill | Driving tek screws into posts, rails, and mount plates. |
| Tape measure + level | Measuring post spacing, rail lengths, and confirming everything is plumb and level. |
| Angle finder | Measuring stair angles for post cuts and panel alignment. Essential for stair sections. |
| #2 and #3 Robertson square driver bits | Our systems use Robertson (square) drive tek screws — #10 x 3/4″ for most connections. |
| Safety goggles + hearing protection | Cutting aluminum produces fine metal chips and noise. Non-optional. |
The one thing every system has in common: screw chase alignment
If there’s one concept that applies across every Innovative Aluminum system — picket, glass, and Flex-Rail — it’s screw chase alignment.
Every post has a screw chase — a channel inside the post that accepts the fasteners connecting the post to the mount plates and wall mounts. If the screw chase isn’t aligned with the direction of the railing when you install the post, the mount plates won’t line up, and you’ll either have to pull the post and start over, or force a connection that won’t hold properly.
The rule: Before you fasten any post to the deck, confirm the screw chase is oriented in line with the railing direction. Every installation guide we publish calls this out, because it’s the single most common mistake installers make — and the most frustrating to fix after the fact.
Also: drain holes in the posts should face the same direction as the railing. This prevents water from pooling inside the post.
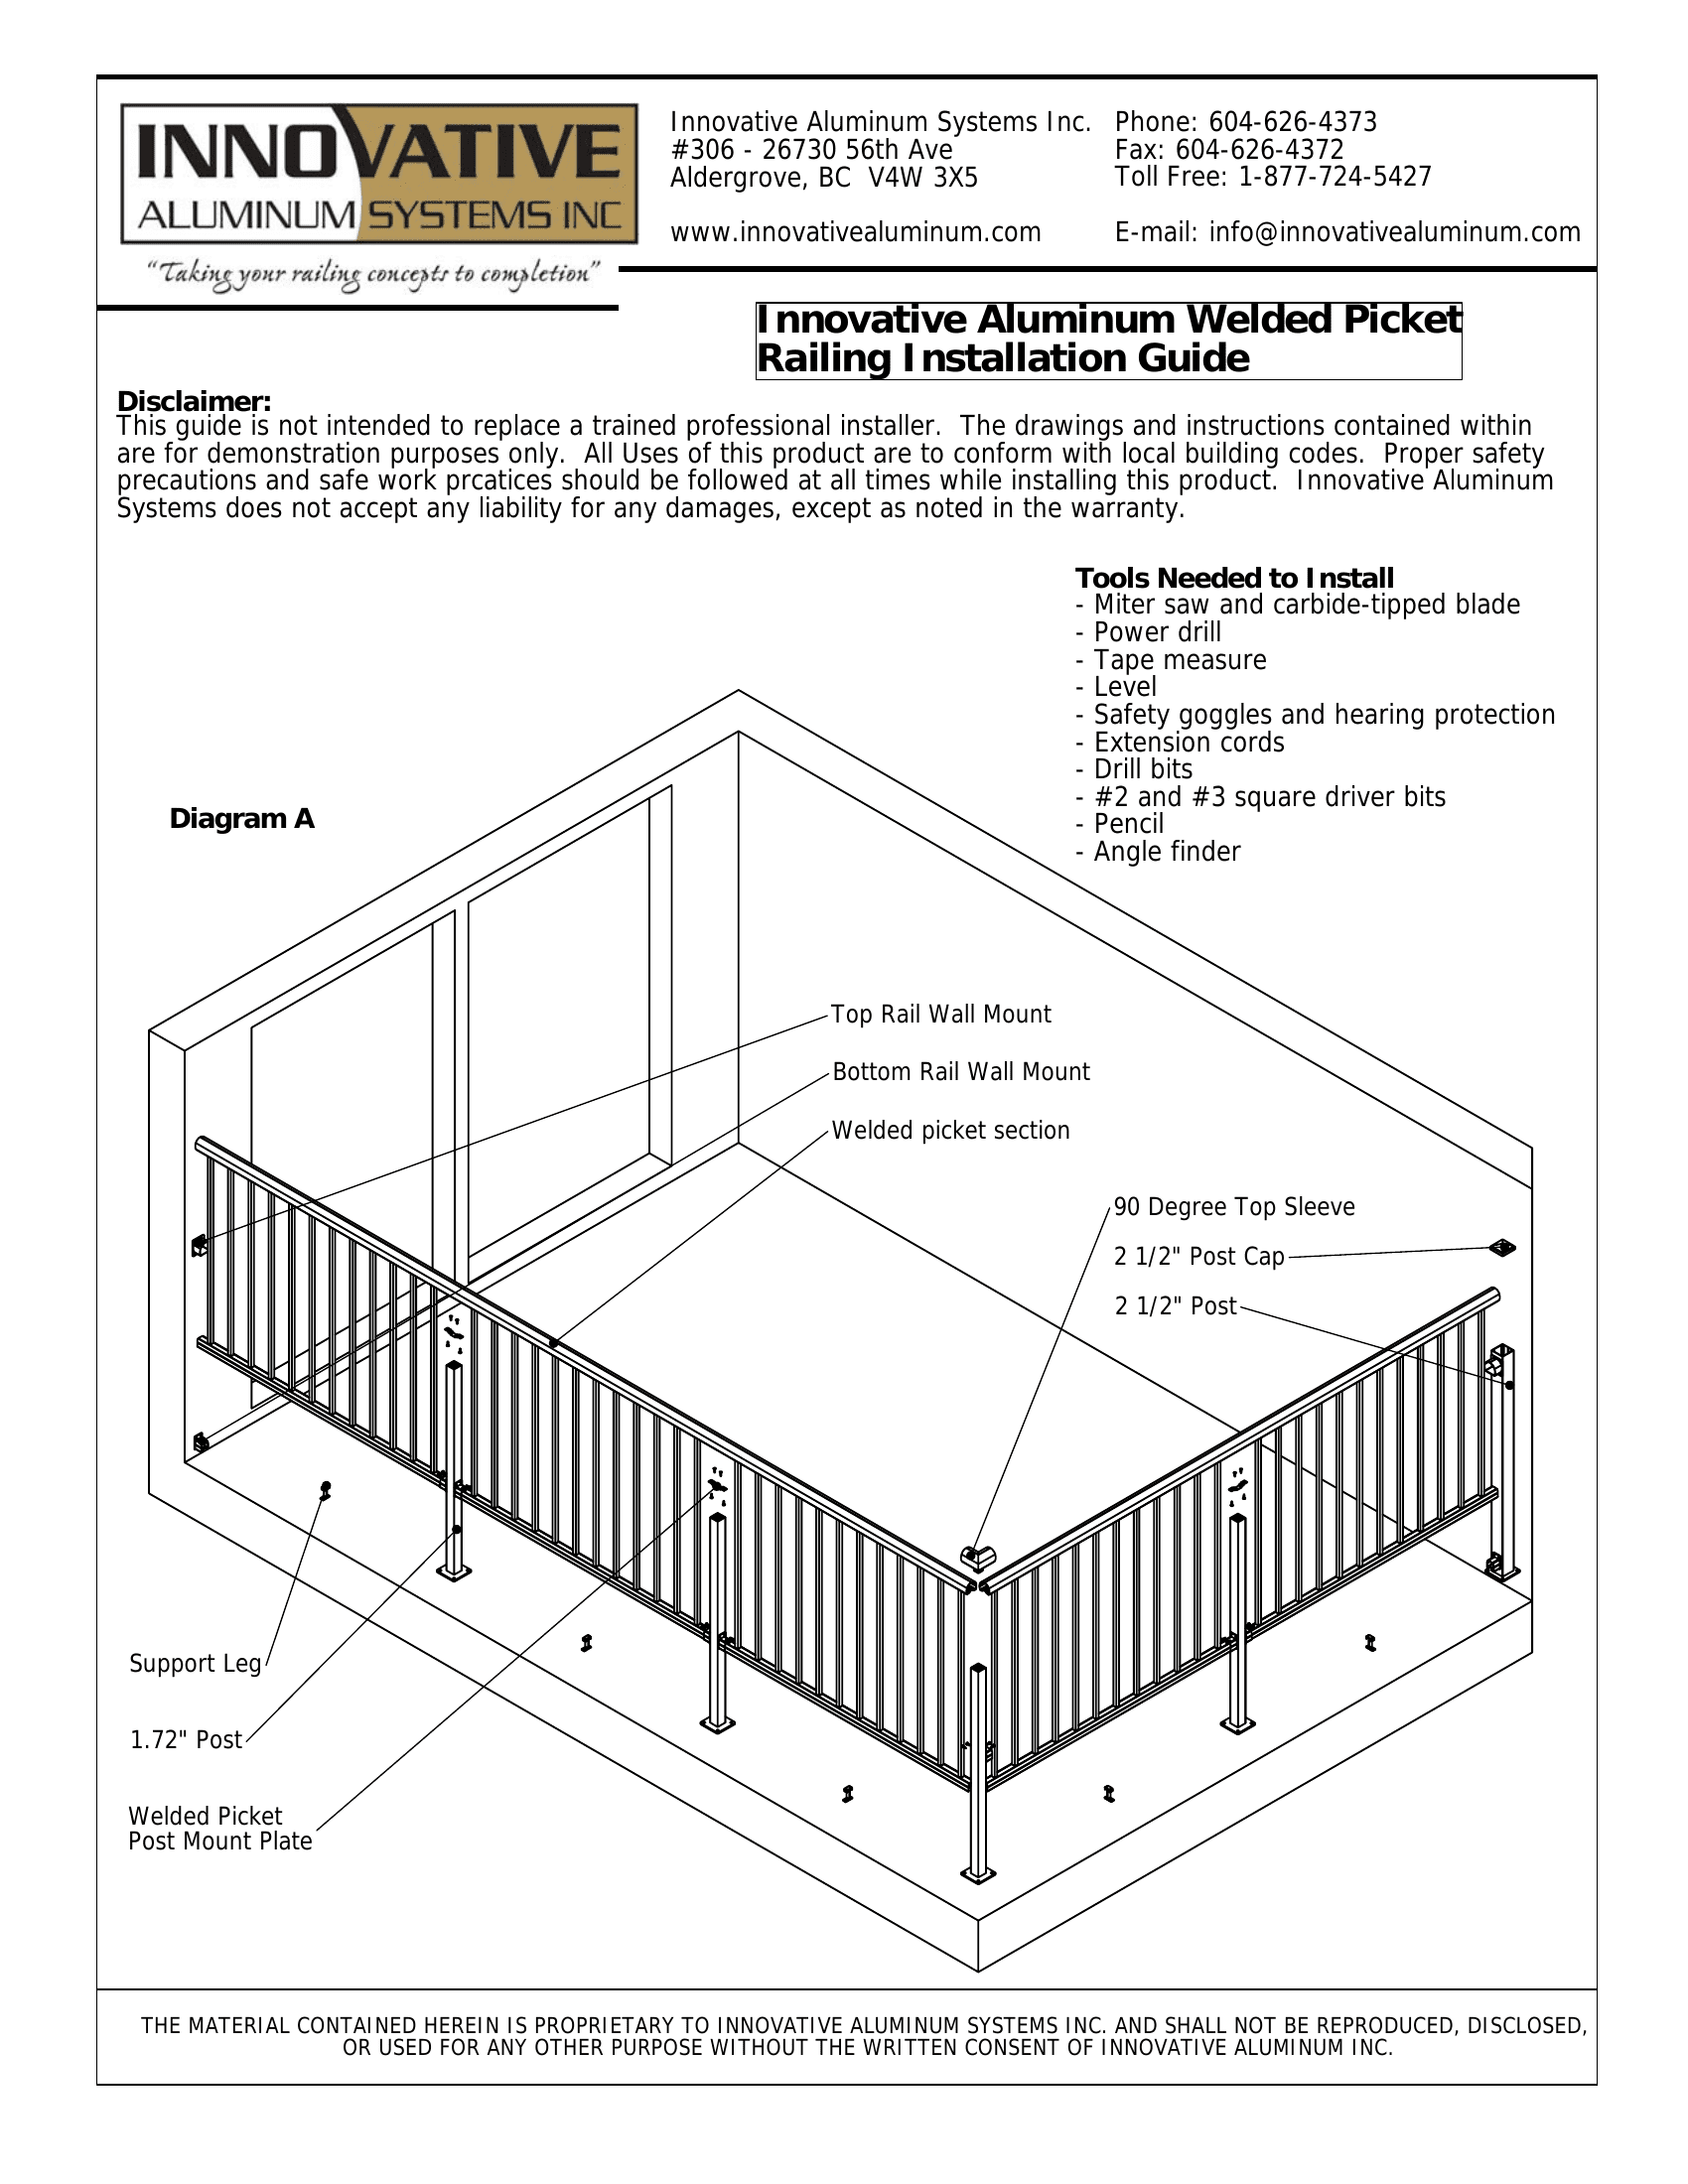
Installing welded picket railing
Picket railing is the most forgiving system to install. The welded picket panels have some flex, the tolerances are wider than glass, and the components are light enough for one person to handle.
The sequence:
1. Prep the posts. Posts that receive a top sleeve get trimmed down by 1/8″. Posts that receive a post mount plate stay full height. Install mount plates using #10 x 3/4″ tek screws.
2. Set corner and end posts. Temporarily install sleeve posts and end posts to determine cut sizes for the welded picket panels. Standard baseplate position is 1″ from the deck edge to the edge of the baseplate.
3. Cut the panels. Measure the openings between posts. Allow 1/2″ at each location that gets a sleeve so the panel has room to fit. For each mid post, you’ll need to cut out a picket from the panel — cut the bottom rail 1/2″ from the post edge, then break the weld on the top rail.
4. Attach mid posts. Position bottom wall mounts over the bottom rail. Attach mid posts to the panel using tek screws through the post mount plate into the top rail. Then attach bottom wall mounts to both the post and the bottom rail.
5. Install top rail wall mounts. At any location where the panel meets a wall or a 2.5″ post, install top rail wall mounts. The position can be found by measuring or by sliding the mount over the assembled panel and marking it.
6. Final assembly. Working around the deck, slide bottom wall mounts onto the panels, fit panels into position, fasten posts to the deck, and fasten support legs. Attach all top sleeves to posts.
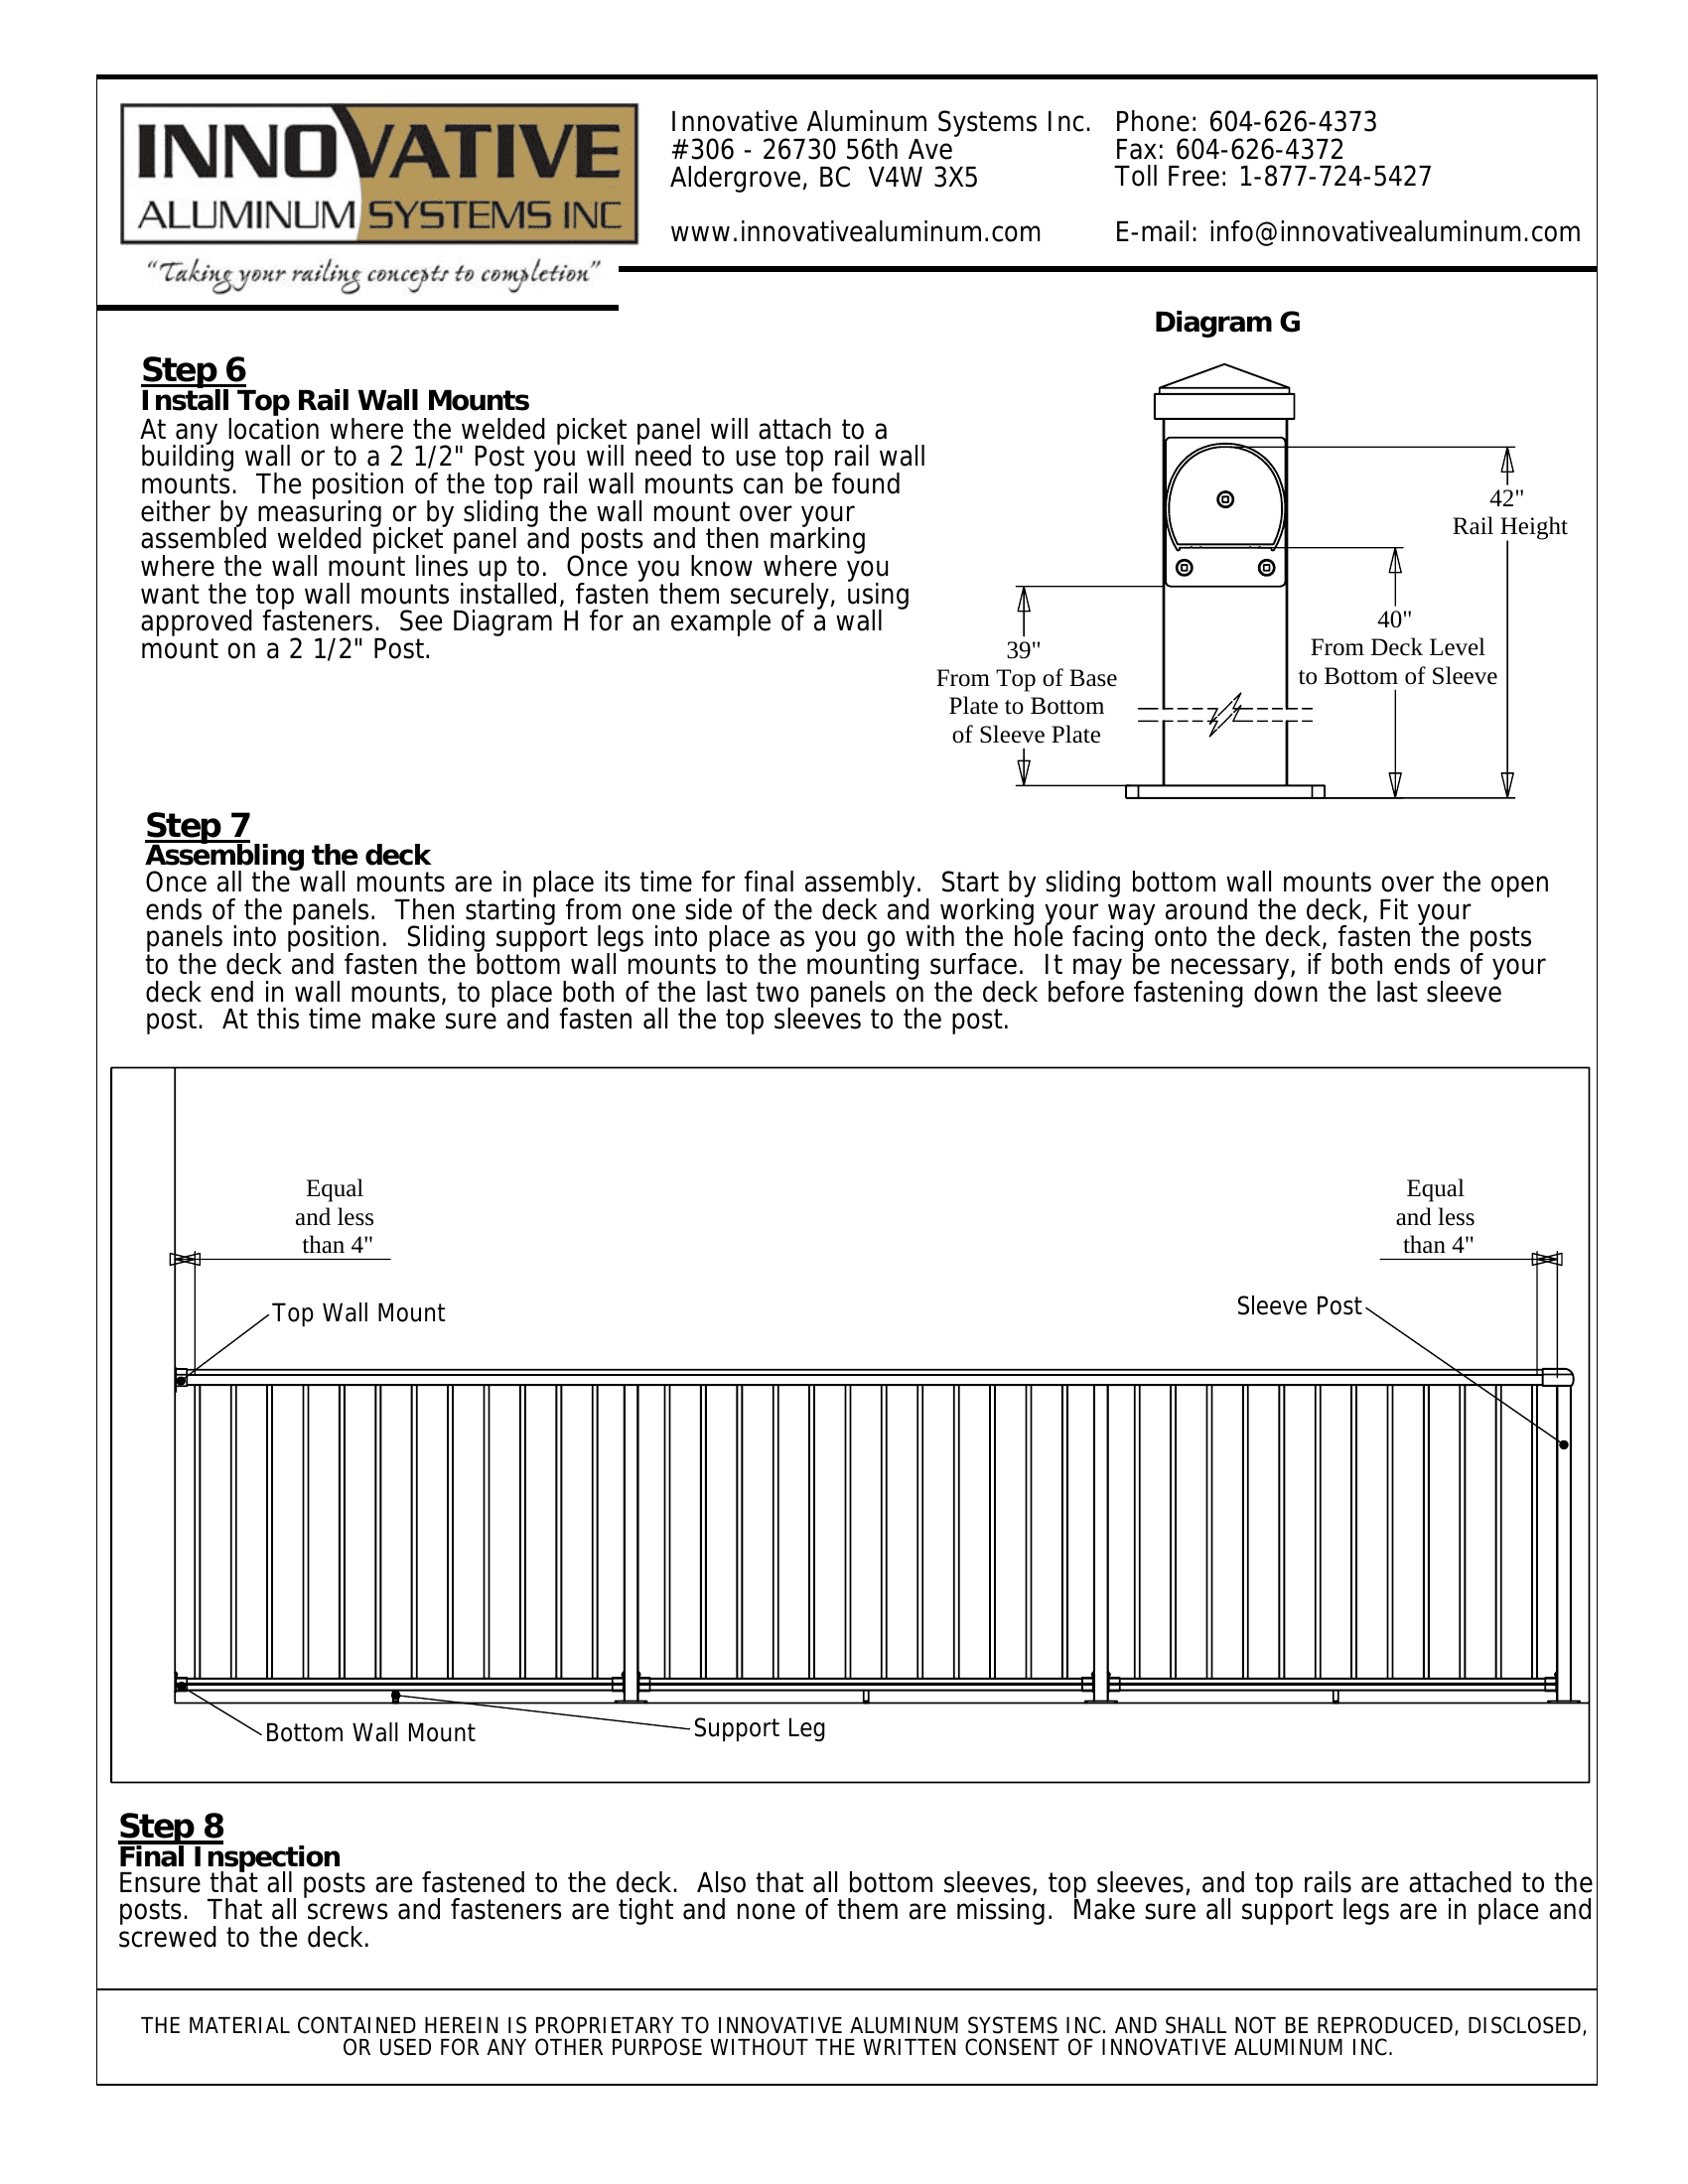
7. Final inspection. Confirm every post is fastened, every sleeve is attached, every screw is tight, all support legs are in place, and no gaps exceed 4 inches.
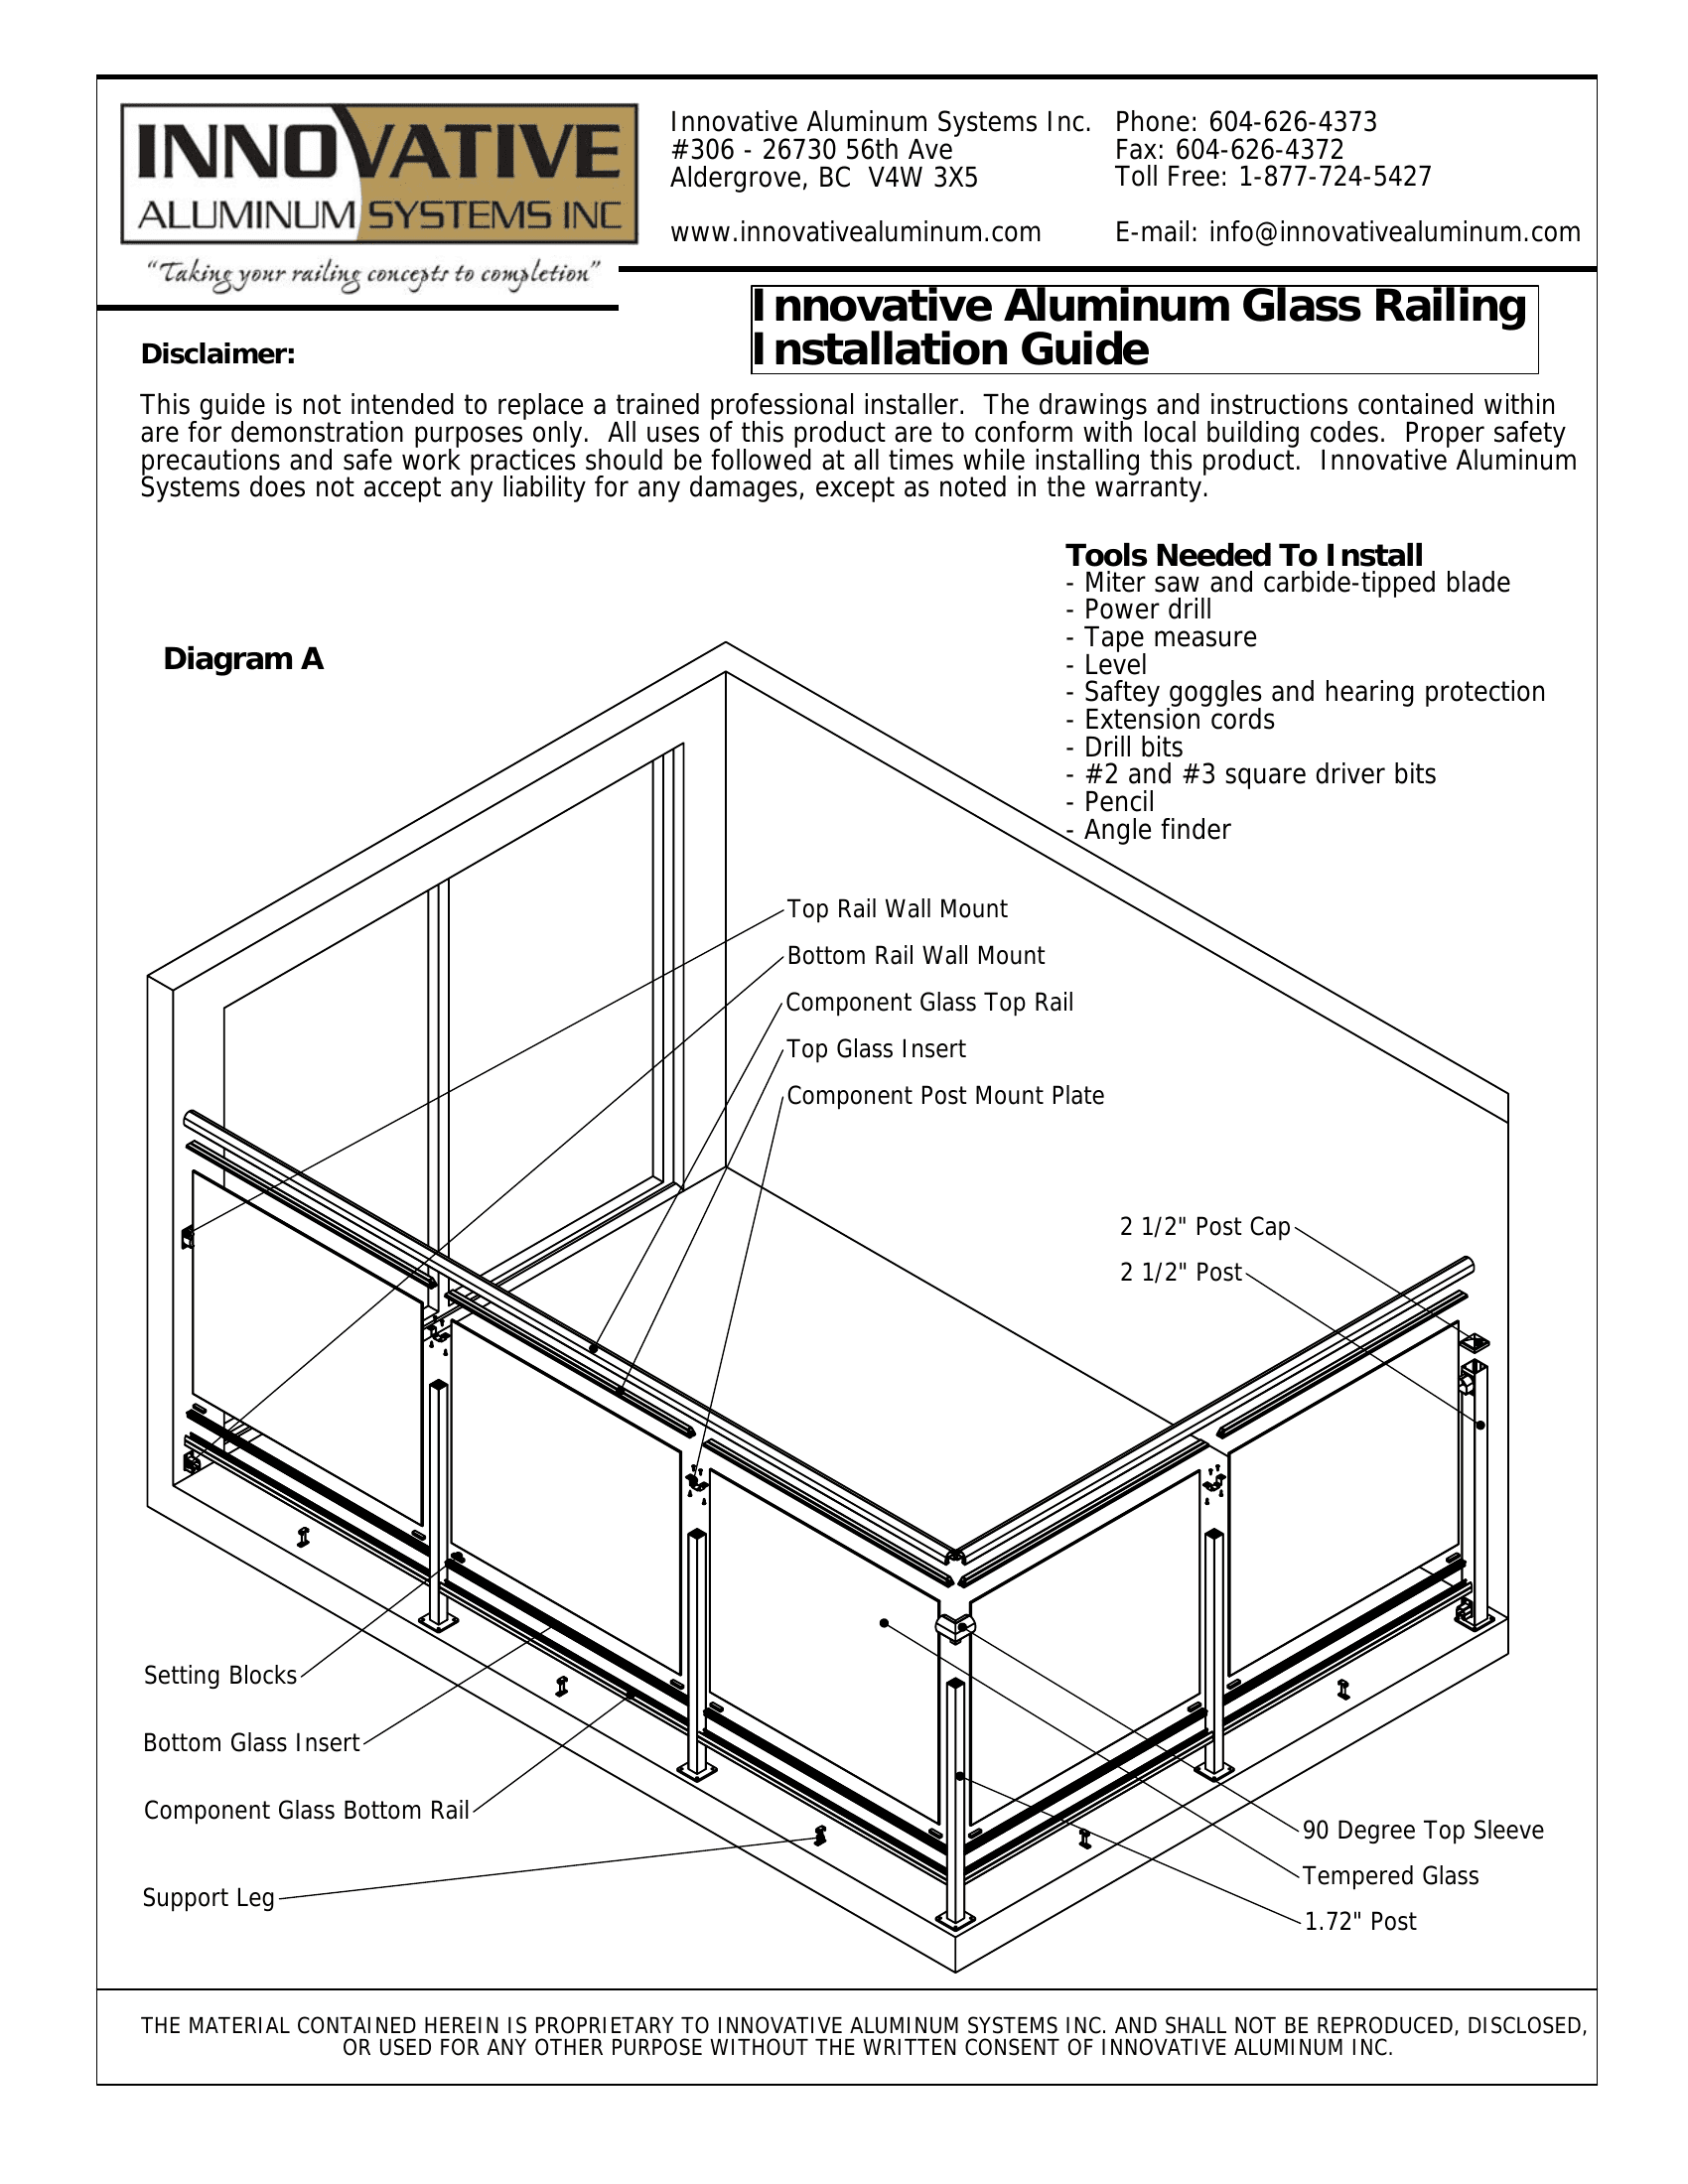
Installing glass component railing
Glass component installation follows the same post-first logic as picket, but adds two critical differences: the glass panels are heavy and fragile, and the bottom rail needs glass inserts and setting blocks installed before the glass goes in.
Key differences from picket:
Bottom rail prep is more involved. Cut the bottom rail and bottom glass insert to length. Install the insert into the bottom rail, then place setting blocks inside the insert before the rail goes onto the deck. Setting blocks hold the glass up at the correct height so it doesn’t slide down and fall out of the channel. Do this before installation — getting setting blocks in after the rail is mounted is much harder.
Top glass inserts need miter cuts. Where the top glass insert meets a post mount plate, cut the insert at 45 degrees to allow clearance. This is a detail that’s easy to miss and annoying to fix on site.
Glass goes in last. After the entire frame is assembled — posts, bottom rail, top rail, all sleeves and mounts confirmed tight — then the glass panels go in. Center each panel in the opening (typical gap between glass edge and post is 2–3 inches). Lift the glass up into the top glass insert, swing it over the bottom rail, and push it down into the bottom insert onto the setting blocks.
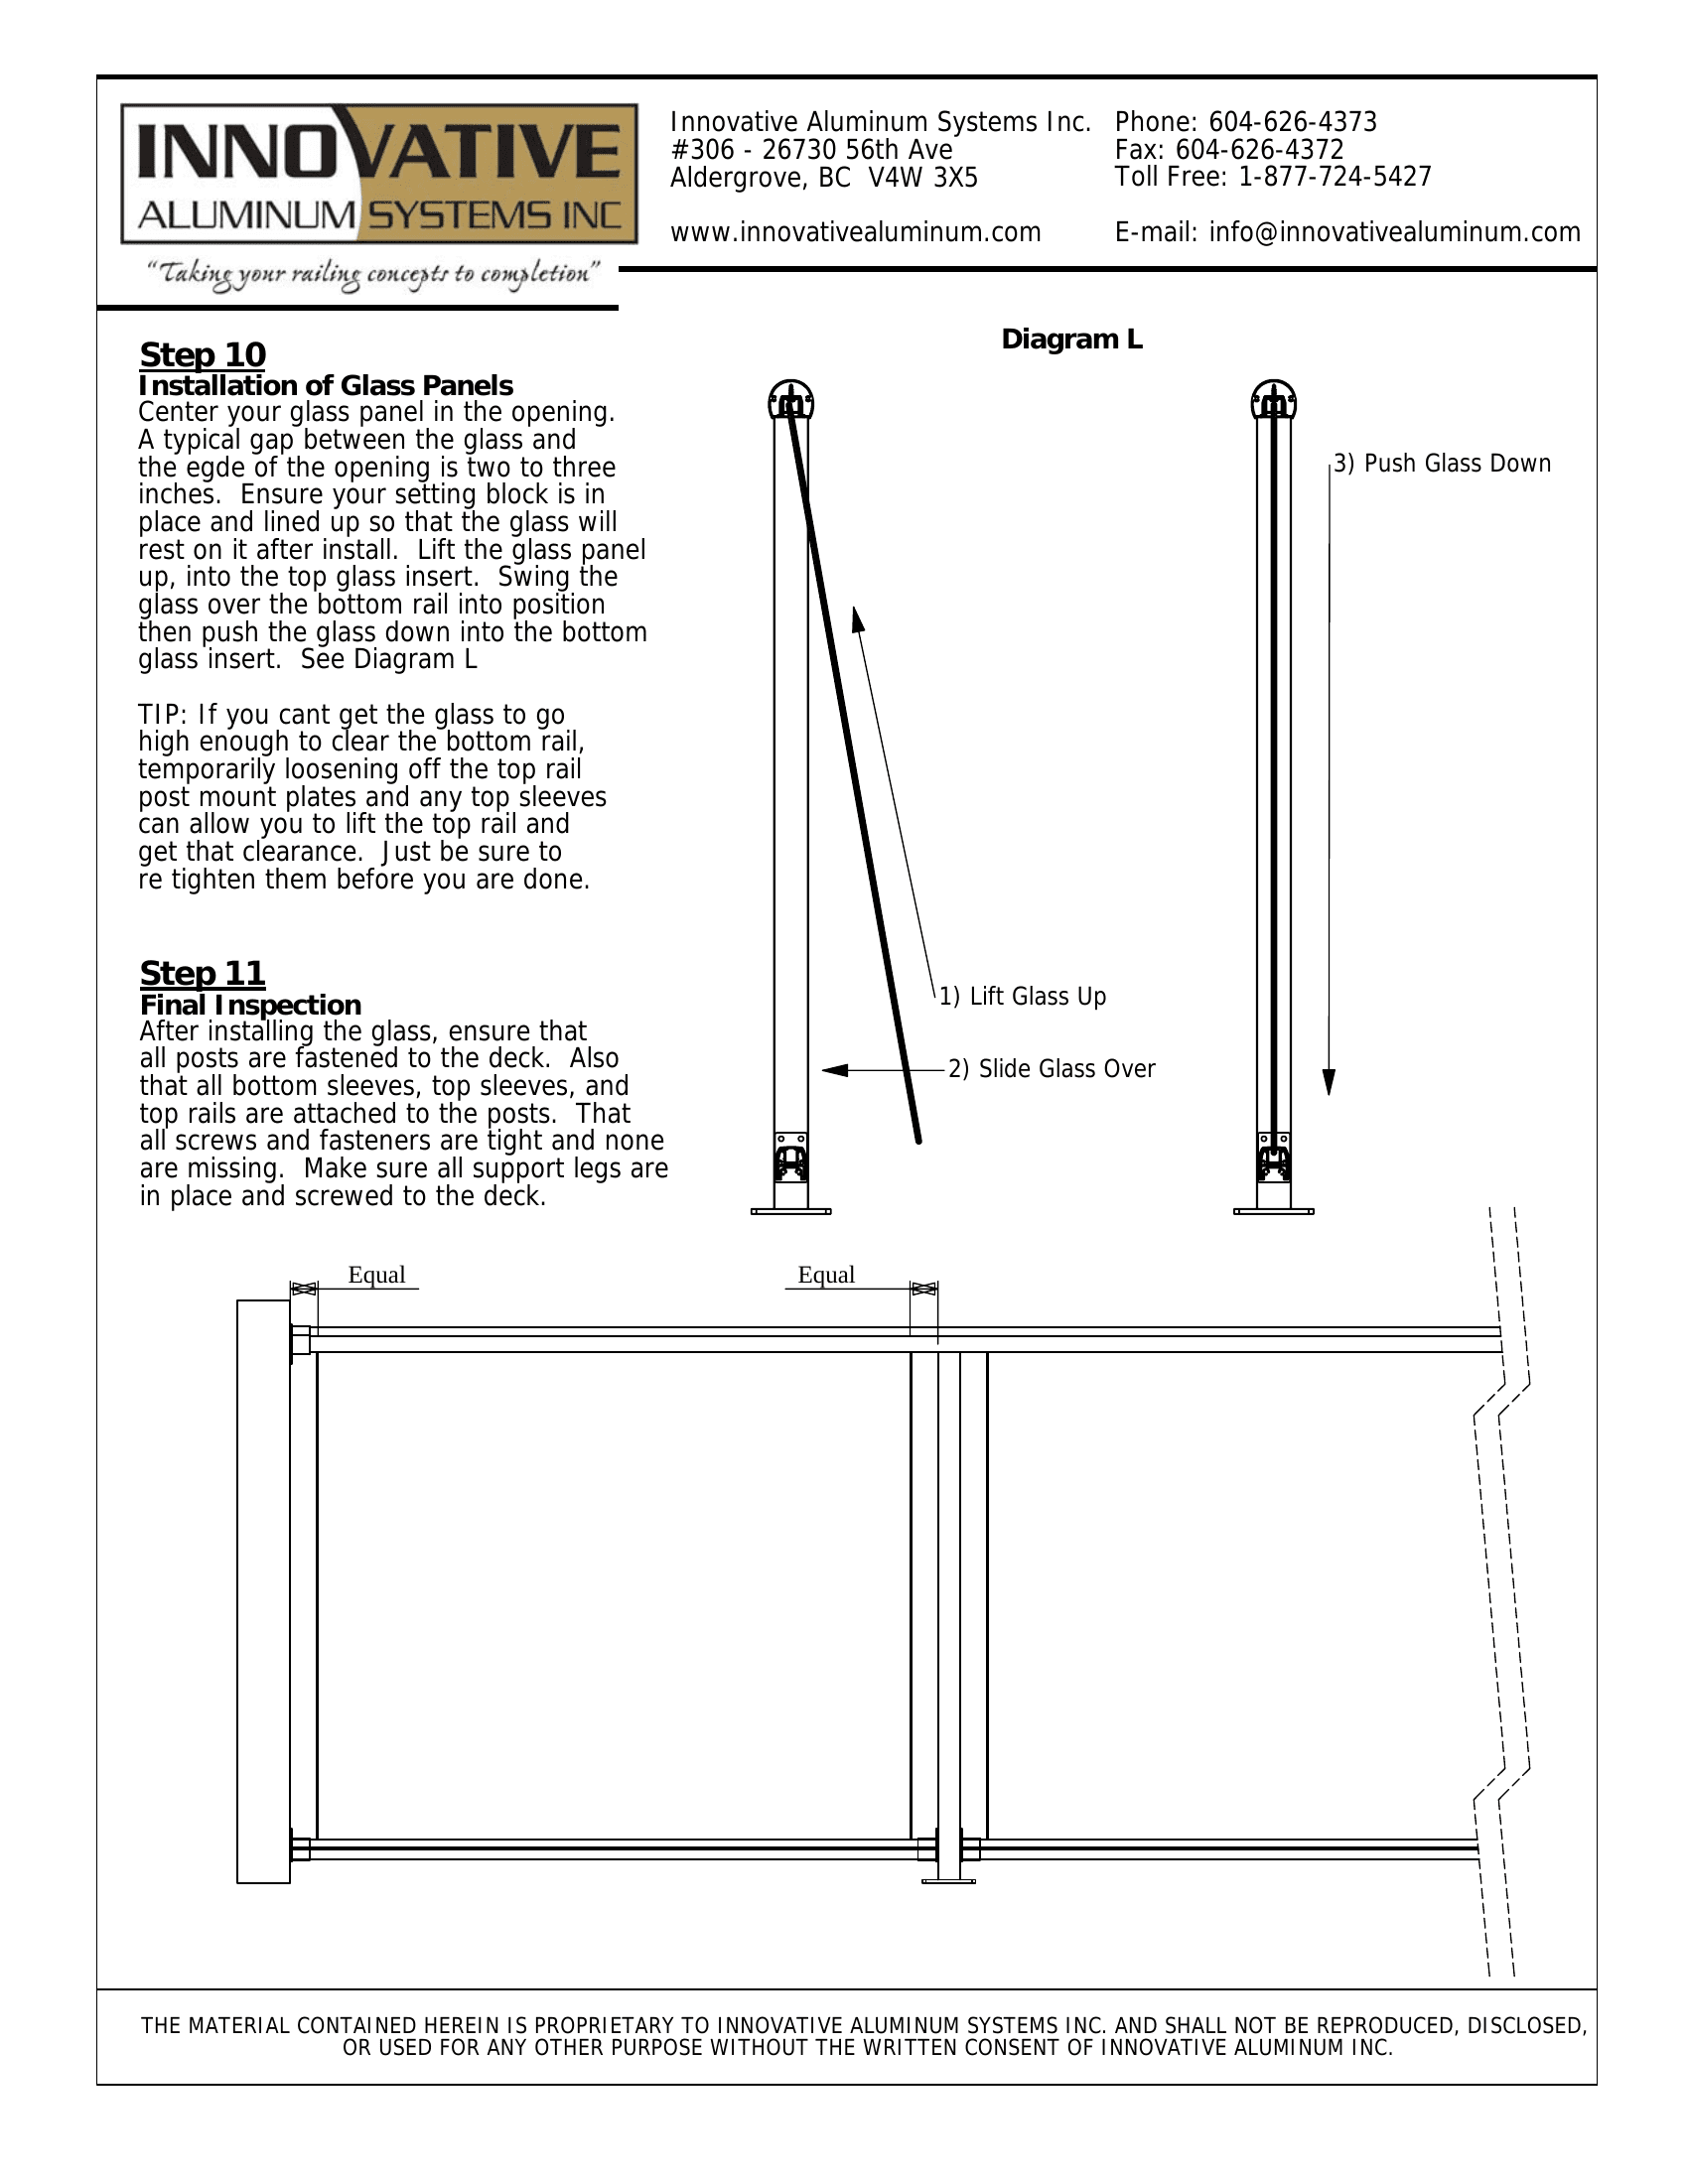
Pro tip from our installation team: If the glass won’t go high enough to clear the bottom rail, temporarily loosen the top rail post mount plates and any top sleeves. This lets you lift the top rail just enough to slide the glass over. Re-tighten everything once the glass is seated.
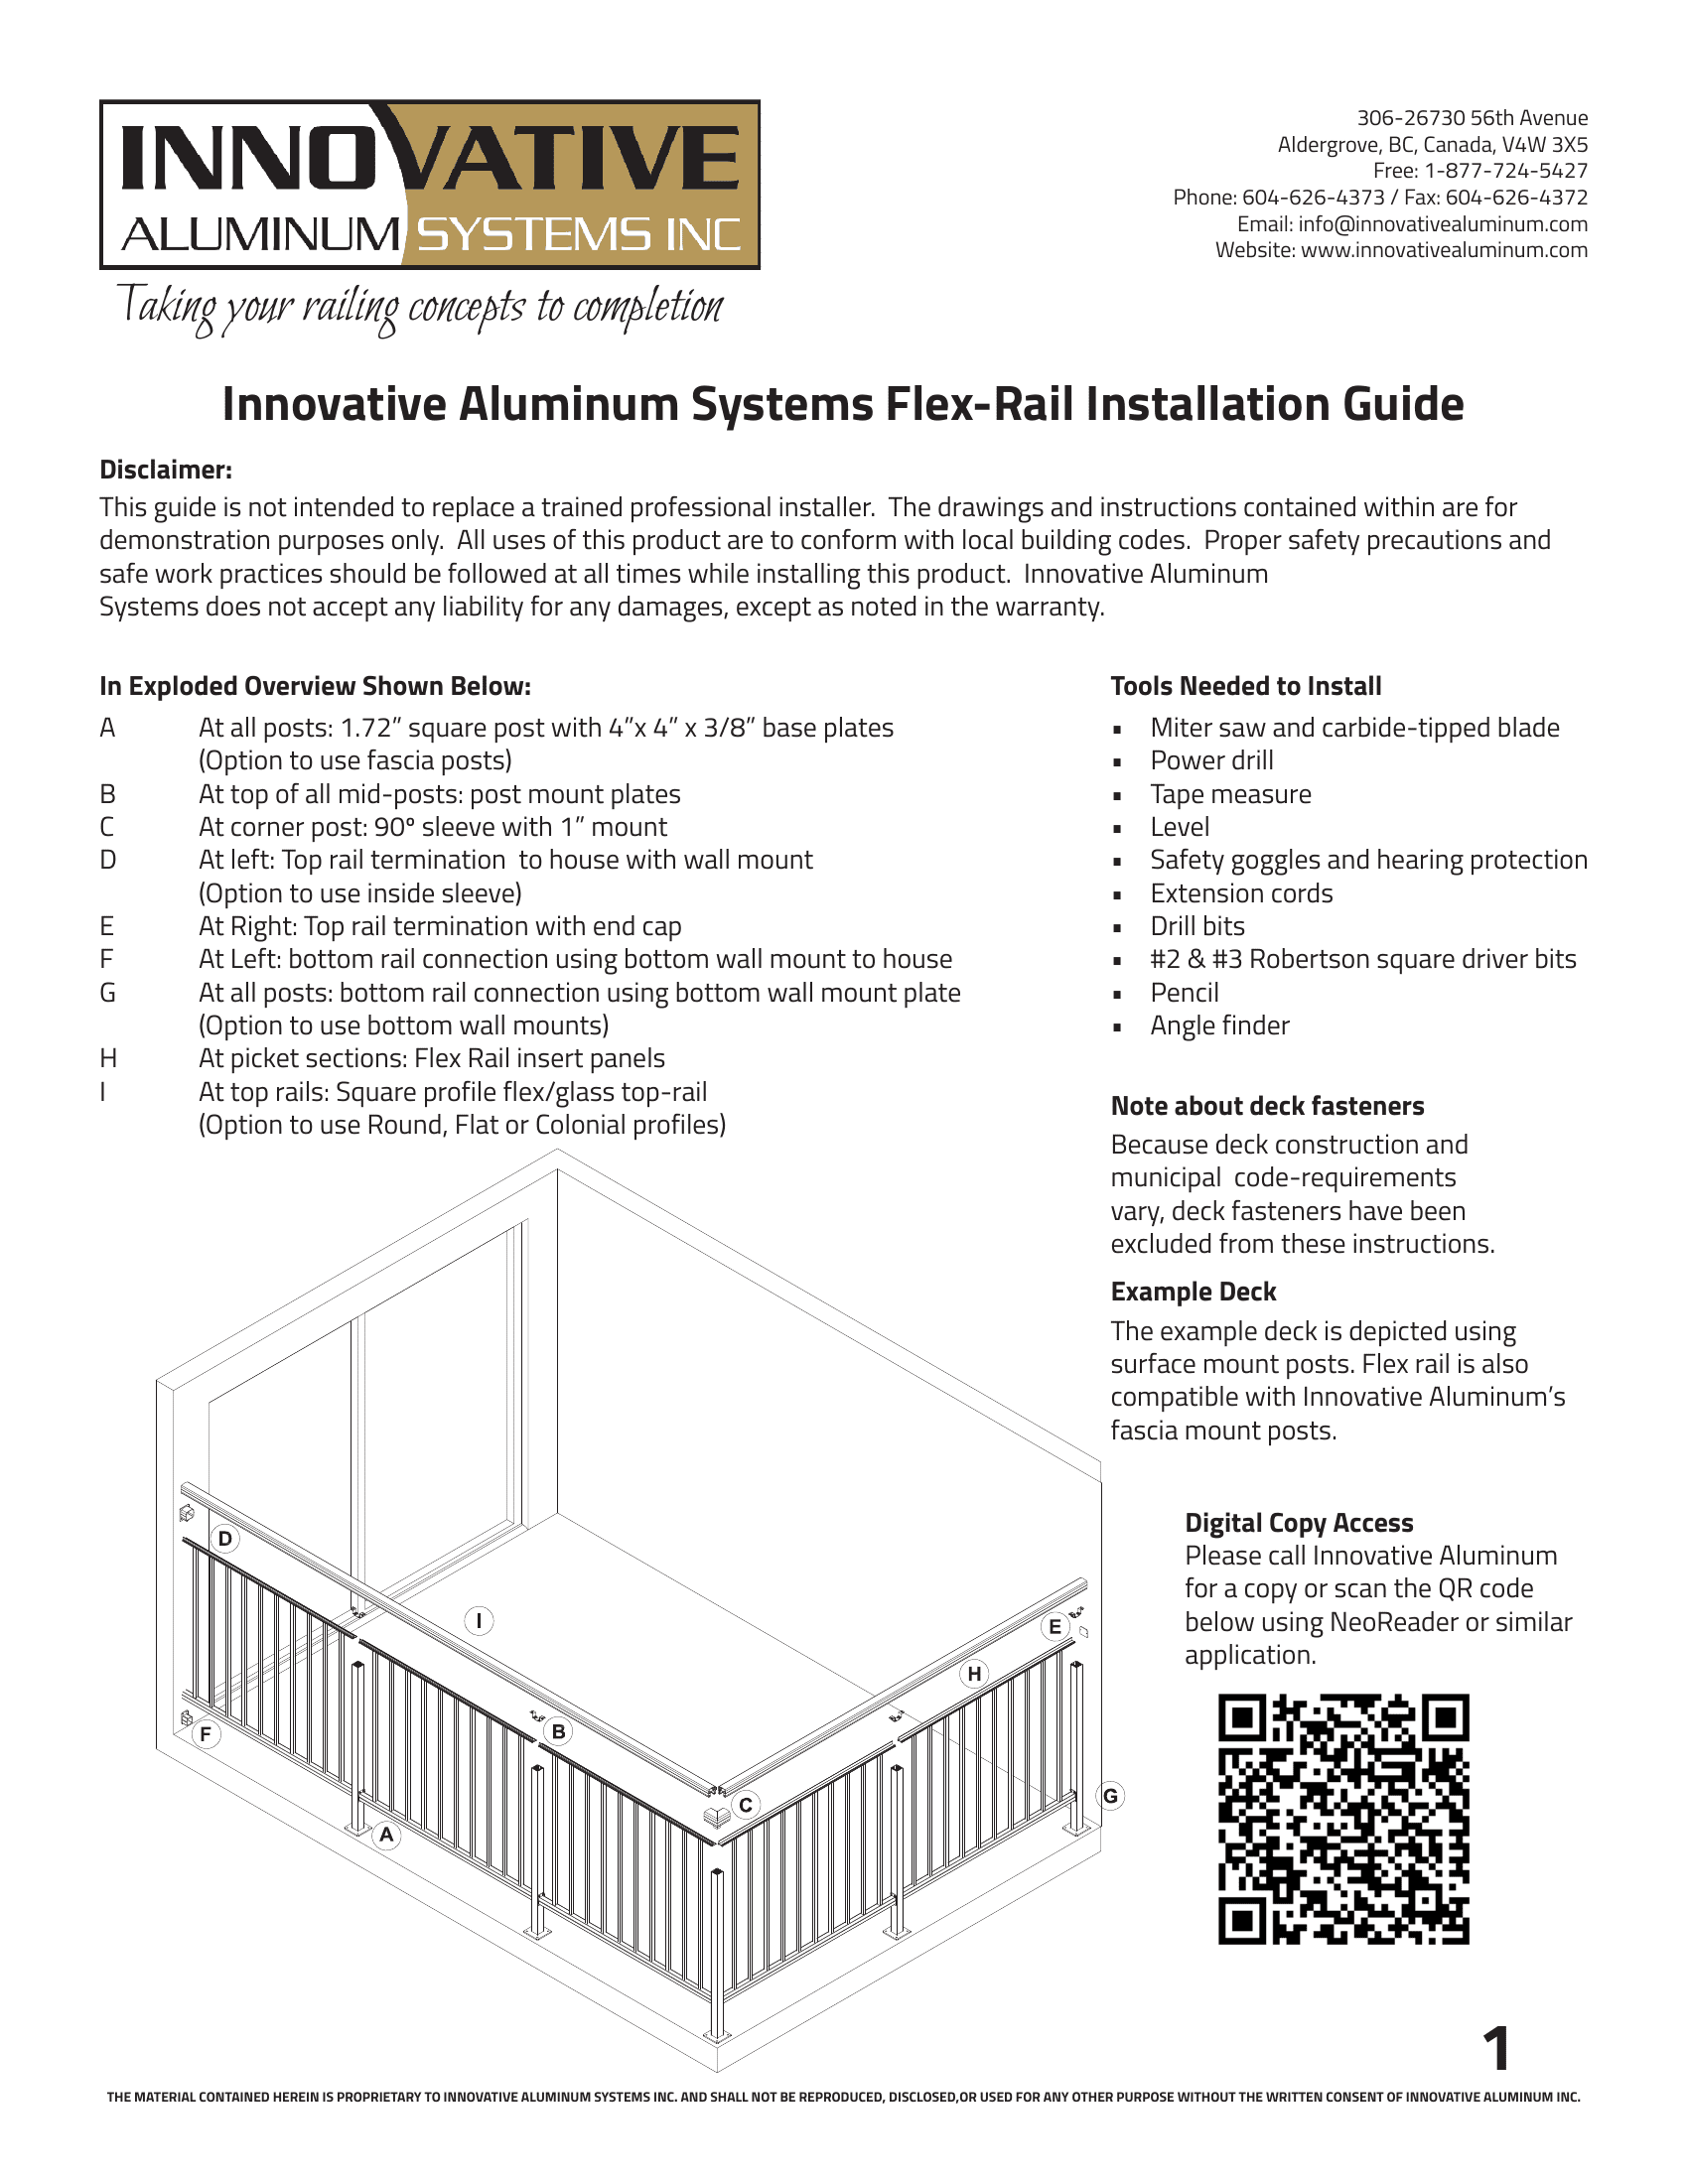
Installing Flex-Rail
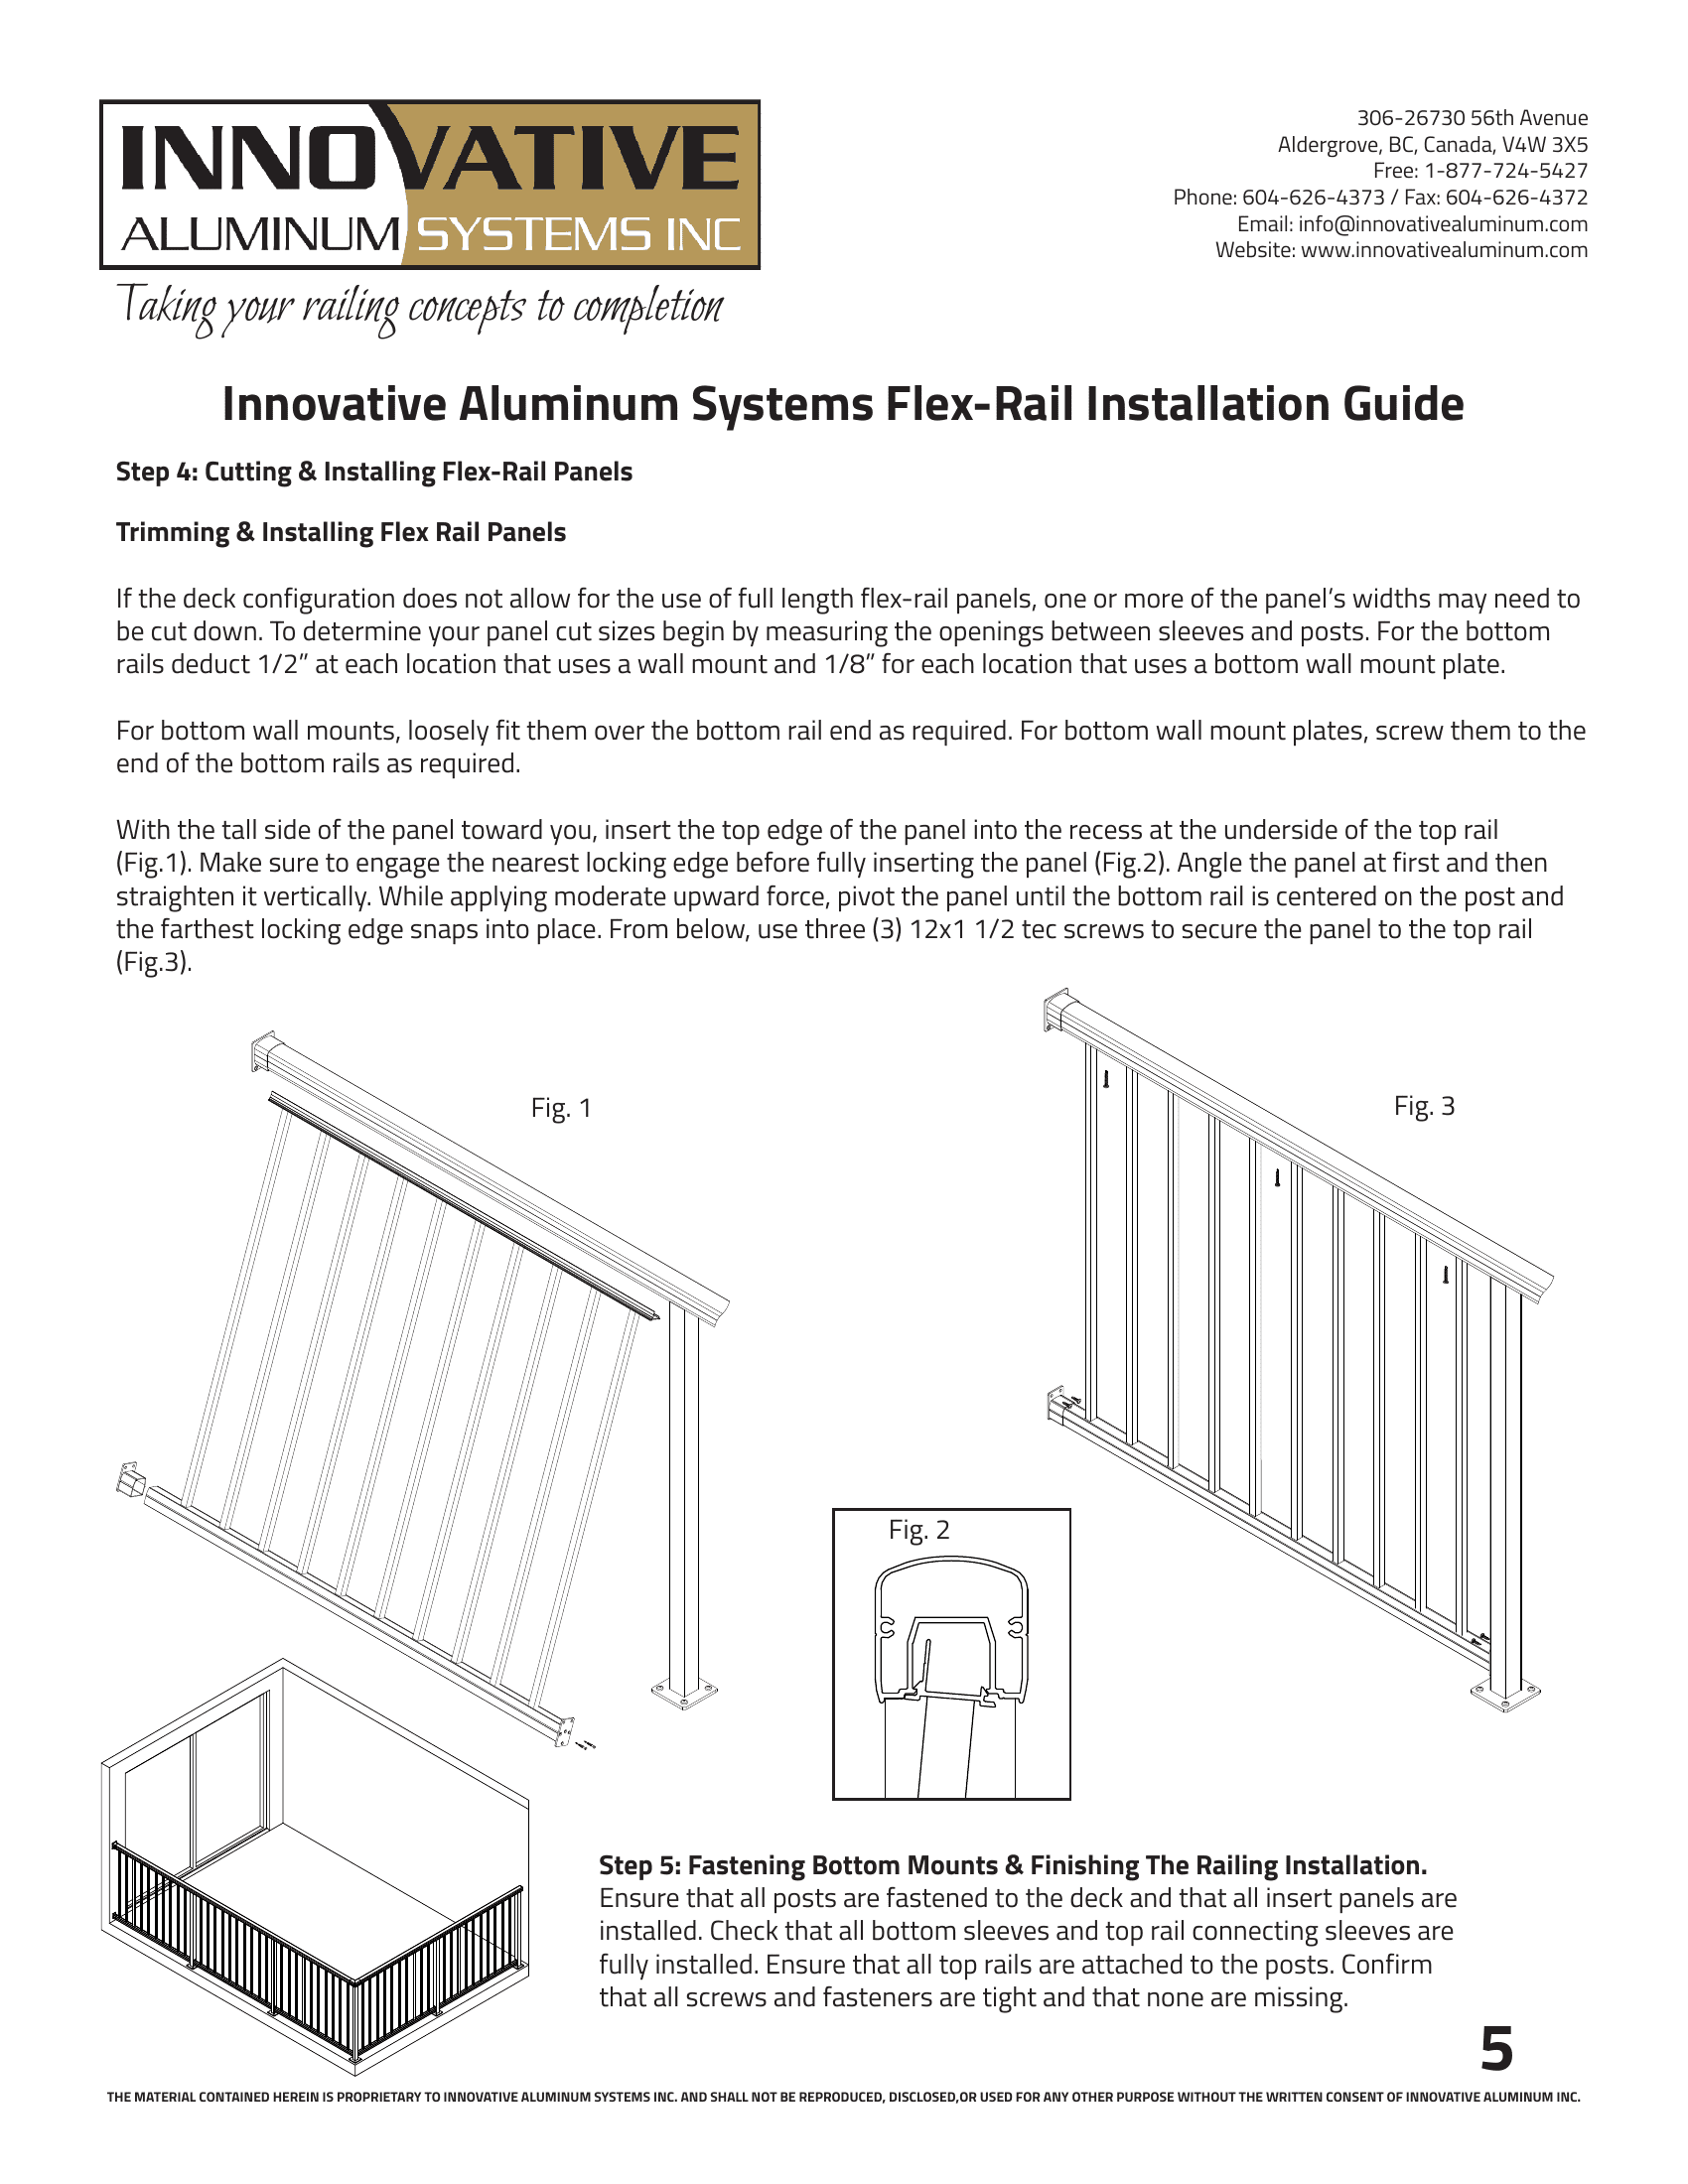
Flex-Rail uses snap-in insert panels instead of welded picket sections or glass. The panels lock into a channel on the underside of the top rail, which makes installation faster once the frame is up. Many of the components — including the post mount plates and top rail — are cross-compatible with our glass system.
The key difference: panels install from below the top rail. With the tall side of the panel toward you, insert the top edge into the recess at the underside of the top rail. Engage the nearest locking edge first, then angle the panel and straighten it vertically. Apply moderate upward force and pivot until the bottom rail centres on the post and the far locking edge snaps into place. Secure with three #12 x 1-1/2″ tek screws from below.
If panels need to be trimmed to width, measure the openings between posts. For the bottom rail, deduct 1/2″ at each end that uses a wall mount, or 1/8″ at each end that uses a bottom wall mount plate.
Surface mount vs fascia mount
This is one of the most searched questions about deck railing installation, and it comes down to aesthetics and structural conditions.
Surface mount is the standard. The post base plate sits on top of the deck surface and fastens down into the framing. It’s simpler to install, provides a strong connection, and works on any deck with solid framing underneath the surface. The trade-off: you see the base plate on the deck surface, and the post takes up a small footprint of deck space.
Fascia mount attaches the post to the side of the deck frame — the rim joist or fascia board. The deck surface stays completely clear, and the railing appears to float at the deck edge. It’s a cleaner look, especially on modern homes. The trade-off: the fascia or rim joist must be structural and strong enough to carry the railing loads. Decorative fascia boards over air gaps won’t work — you need solid backing or blocking.
All Innovative Aluminum systems — picket, glass component, Infinity Topless, and Flex-Rail — are available in both surface and fascia mount configurations.
Common installation mistakes
Screw chase misalignment. Already covered above, but worth repeating. If the screw chase isn’t aligned with the railing direction, the mount plates won’t connect. Check before you drill.
Fastening posts to deck boards only. Posts must anchor into structural framing — joists or blocking. Deck boards alone can’t hold the load required by building code. If there’s no joist at your post location, add blocking between joists before you install.
Forgetting setting blocks (glass systems). Setting blocks go in during bottom rail prep, not after the frame is assembled. If you forget, you’ll have to partially disassemble the rail to add them — or the glass will sit too low in the channel.
Not checking for level before final fastening. The time to shim posts and adjust alignment is before you tighten everything. Once every screw is driven, corrections require partial teardown. Do a full level check before final assembly.
Cutting panels without accounting for sleeves. Every sleeve connection needs 1/2″ of clearance. If you cut the panel to the exact opening width, it won’t fit once the sleeves are in place. Measure, deduct, then cut.
Not having help for glass panel installation. Tempered glass panels are heavy. Attempting to lift, swing, and seat a glass panel solo on an elevated deck is a safety risk and a good way to break an expensive panel. Two people minimum for glass.
Download full installation guides
The overviews above cover the key concepts. For complete step-by-step instructions with detailed diagrams, download our installation guides:
Welded Picket Installation Guide
5-page PDF — post prep, panel cutting, mid post installation, final assembly and inspection.
Glass Component Installation Guide
6-page PDF — bottom rail prep, glass inserts, setting blocks, top rail, glass panel installation.
10-page PDF — deck and stair installation, panel insertion, snap-in locking detail.
Stair Railing Installation Guide
4-page PDF — angle cutting, stair post positioning, the 6″ sphere rule at stair nosings.
Note: These guides are for demonstration purposes. All installations should conform to local building codes. If you’re not comfortable with the process, work with a professional installer — our dealer network can connect you with experienced installers in your area.
Need help planning your installation?
Our team can help you figure out the right system, confirm your layout, and connect you with an installer. Free consultation — no commitment.
Frequently asked questions
How do you install aluminum deck railing?
Plan your layout and post locations first. Install posts (surface or fascia mount), ensuring screw chase alignment. Then install bottom rails, attach panel sections or glass, install top rails and sleeves, and do a final inspection. The exact steps vary by system — download the full guide for your specific system above.
Can I install aluminum deck railing myself?
Picket and Flex-Rail systems are DIY-friendly with basic tools — a miter saw with carbide blade, power drill, level, and tape measure. Glass railing is strongly recommended for professional installation because post alignment tolerances are tighter and the panels are heavy and expensive to replace if damaged.
How do you attach deck railing posts?
Posts mount using base plates with appropriate fasteners into structural framing. Surface mount sits on top of the deck. Fascia mount attaches to the side of the deck frame. A solid mounting surface is required at every post location — posts cannot be fastened to deck boards alone. Standard centerline is 3 inches from the deck edge.
What is fascia mount vs surface mount deck railing?
Surface mount posts sit on top of the deck. Fascia mount posts attach to the side of the deck frame, keeping the deck surface clear. Both meet code when fastened to structural framing. Fascia mount gives a cleaner look. Surface mount is simpler to install.
What tools do I need to install aluminum deck railing?
Miter saw with carbide-tipped blade, power drill, tape measure, level, angle finder (for stairs), drill bits, #2 and #3 Robertson square driver bits, pencil, safety goggles, and hearing protection. No welding or specialty tools required.